|
|
Post by Bashan on Aug 12, 2014 20:15:54 GMT -6
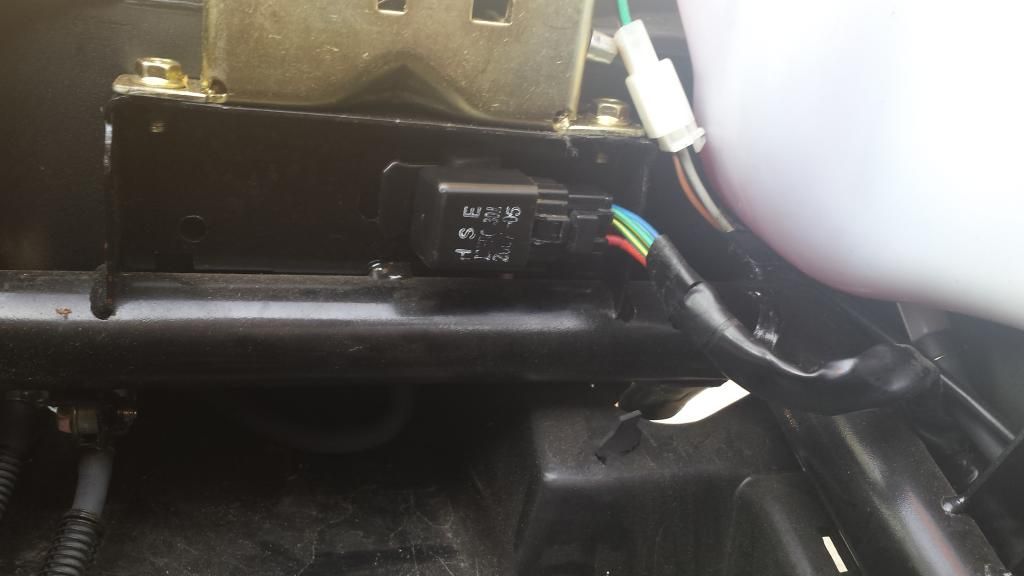
I'm not sure this is a starting relay, I thought that was part of that box behind it, that's why I thought it might be the CDI but now I realize it's just a mounting bracket:
A starting relay has two small wires that come from the start button and the brake light wire; then two battery cables. I don't see anything capable of carrying battery amps on that device. On the diagram it shows a red, that's there; a blue/white, that might be there; a green/yellow, I think that's there; and a red/yellow, that I don't see. That looks like a light relay or something like that, no battery cables, no starter relay in my estimation. What makes this so problematic is the wire colors are completely atypical, it's almost like they made a point to be different. It makes it tough. Rich
|
|
|
|
Post by Bashan on Aug 12, 2014 20:53:24 GMT -6
This is the bundle from your stator:
The Y/R and W/R are the AC power sources for lighting and charging. By the diagram it appears to be a center tapped system. Therefore, test the Y/R and W/R by completely unplugging the pigtail. Set your meter to AC up to 100v AC. Ground one probe, hook the other probe to the wire to be tested. If the bike won't start remove the plug and crank it. Do both wires the same way. The W/R is the center tap and should come in 15 to 20v AC approx. The W/R maybe 20 to 40v AC. Lack of power on those wires can cause poor charging or lack of lights.
The R/B is your AC power. Unhook it and test from stator side same as above BY JUST CRANKING IT. 50 to 100v AC. That supplies your CDI and lack of power there equals no spark. Make sure the kill is set to run, just remove the plug to crank.
The blue is your trigger, set your meter way low if it's not auto ranging to maybe 10v AC, test as above by cranking. You should get around 1v AC as the CDI trigger, .5v AC is OK. Less than that can cause no spark syndrome (NSS).
Black is ground on this bike, you can test for continuity both sides of the connector to frame and see what you get. Just ground one probe on a good clean frame spot like a bolt hole, and test with the other probe. If you get a continuity tone you know the ground is good.
|
|
Senior Clinician

Currently Offline
Posts: 100  Likes: 1
Joined: Jun 25, 2014 12:08:08 GMT -6
|
Post by tominbmore on Aug 13, 2014 10:10:37 GMT -6
Rich, That is some outstanding input, thank you! I am an electrical noob, so when i finish work I will read your conclusions and suggestions very closely. Could you let me know what you mean by "pigtail?" Also, when you wrote, "Make sure the kill is set to run, just remove the plug to crank.," does crank mean kick start? Same thing? And does "kill set to run" mean don't have the kill switch on? have it as i would have it when i normally start my scooter? Also, by "remove spark," do you mean remove the spark plug? if so, is there a special tool I need? the plug, located up fronmt near the battery, has a large bolt securing it. I have never before removed it, so I wonder whether a special tool is needed, or whether a wrench will do. Could you also let me know what you mean by "set your meter way low if it's not auto ranging?" I have an Equus (Innova) 3320 voltmeter, with digital display... Link to multimeterFinally, could you elaborate for me, in dummy terms, what conclusions I would draw from each of your tests if, say, the voltage is lower than what you say it should be? For example, does a low voltage on the first test suggest bad wires? Bad wire connection? Bad stator? Same with the AC power and "trigger" tests -- what can I conclude iof the reading falls short? I will faithfully follow your instructions -- thanks again! -- and report back. I will first trickle charge my battery with the schumacher charger/maintainer i bought last night. I had a low battery reading of 12.15, so that appears to be at least part of my problem... |
|
|
|
Post by Bashan on Aug 13, 2014 11:20:58 GMT -6
When you unplug everything coming from the stator the bundle of wires is called the "stator side pigtail" because it looks like a pig's tail...kinda. The bundle of wires on the other side of the connector is the "bike side pigtail".
Set the killswitch to run, the position that the bike will start and run. If it's in the stop position it will kill the spark and possibly ruin some of the tests.
For the two stator wire tests you can do it with the bike running if it will start. If it won't pull the spark plug so you can get a few RPMs going with the starter. The plug should come out with a spark plug socket. Just pull the coil wire off and get a spark plug socket. Get us a pic of the "large bolt" if you can't just pull the wire off.
Low voltages on the yellow and white wires in the pigtail stator side would explain bad lighting or bad charging. It would mean your stator itself is bad and needs to be replaced.
Low voltage on the red/black would explain no spark and would mean a bad stator....replace it.
The blue wire triggers the CDI to fire, no voltage on it would cause no spark...replace trigger coil which is separate from the stator and hangs above the flywheel:
|
|
Senior Clinician
Currently Offline
Posts: 100
Likes: 1
Joined: Jun 25, 2014 12:08:08 GMT -6
|
Post by tominbmore on Aug 13, 2014 12:18:21 GMT -6
Awesome, thank you Rich!!
|
|
Senior Clinician
Currently Offline
Posts: 100
Likes: 1
Joined: Jun 25, 2014 12:08:08 GMT -6
|
Post by tominbmore on Aug 13, 2014 19:34:03 GMT -6
Hey fellas,
I'm in the process of charging my battery (which had a non-load reading of 12.15 two days ago). It is still in charging mode, using the Schumacher charger/maintainer Alleyoop suggested (thanks man).
I'm not sure how long it should take. I have seen enough online vids now to conclude that for batteries that aren't giving really low readings, it might take anywhere from 60 minutes to a few hours to get to maintainer levels. For me it has been two hours so far… thought I'd ask you if you know how much time I can expect this to take.
Tx!!
|
|
|
|
Post by Alleyoop on Aug 13, 2014 20:10:29 GMT -6
There should be lights on the right side below the settings a light should come on when charging then another light should come on when fully charged. Read the instructions some have lights some have an actual gauge that you can see when it reachs a full charge.
Alleyoop
|
|
Senior Clinician
Currently Offline
Posts: 100
Likes: 1
Joined: Jun 25, 2014 12:08:08 GMT -6
|
Post by tominbmore on Aug 14, 2014 8:32:59 GMT -6
Thanks Alleyoop,
Got 'er charged and maintained overnight. After disconnecting the Schumacher, and waiting for an hour or so, I checked the DC output with my voltmeter. Previously it was at 12.15 DC volts. This morning it was at 12.82.
Definite improvement. After work i will re-connect the battery (I had to take it inside bc I ain't got no garage), and see if she starts and does not die on me.
If she stays alive, I'll assume the problem was solved. If she dies like she did before, I'll do the charging system test again with my voltmeter. If there continues to be a low reading with the engine revved (last time I checked it was no higher than 12.5 at high rpms), then I'll run through the individual stator/rectifier tests you both recommended, using Rich's very helpful identification of the wires in my photo.
Tx as always.
T.
|
|
Senior Clinician
Currently Offline
Posts: 100
Likes: 1
Joined: Jun 25, 2014 12:08:08 GMT -6
|
Post by tominbmore on Aug 14, 2014 17:55:36 GMT -6
Hey guys,
So I put the battery back in and checked the voltage reading again. 12.77.
I started the engine. The volts drooped temporarily to about 12.5.
I started revving the engine and the volts climbed but not super quickly. After about 30 or more seconds of high rpms (10000 or so), the reading had reached 13.4/13.5.
I let it go back to idle and watched to see if the scooter would stumble and slowly cut off like it has been doing. Eventually it did... at a steady idle for a minute or so but then slowly the needle drooped below 2000 rpm, the engine sounded weaker, and it cut off.
I promptly tried to crank the ignition again but the engine wouldn't start at all (ssame problem I'd experienced when this whole thing started).
My question is this: is this even a charging system issue? I thought thst if the voltage reached 13 - 14.5 DC volts at high rpms, then the problem is not the charging system. But here I am with this weird slow dying symptom thst I previously thought was electrical.
I'm going to do those individual tests Rich discussed above. But still, based on these readings, I have to ask: What do you guys think?
Tom
|
|
|
|
Post by Bashan on Aug 14, 2014 19:23:12 GMT -6
First check your spark. Hold the plug electrode, the curved wire, against the valve cover and crank with the starter. See what the spark looks like, blue, orange, nonexistent. Next, test the red/black wire from the stator pigtail. If the voltage is low or intermittent that's your problem. If that's good test the trigger, same deal there. Rich
|
|
Senior Clinician
Currently Offline
Posts: 100
Likes: 1
Joined: Jun 25, 2014 12:08:08 GMT -6
|
Post by tominbmore on Aug 14, 2014 20:34:41 GMT -6
Rich,
Sorry I keep asking questions. The "valve cover" -- what exactly is that?
Also, what is the significance of what color the spark is?
Also, can you explain the principle as to why I should remove the spark plug and crank when doing some of these tests? Wouldn't removing the spark plug interrupt a key part of the whole charging system?
Finally, what tool do I need to remove the spark plug? Can they be bought from any old auto store? Are they pricey?
|
|
Senior Clinician
Currently Offline
Posts: 100
Likes: 1
Joined: Jun 25, 2014 12:08:08 GMT -6
|
Post by tominbmore on Aug 14, 2014 21:19:57 GMT -6
Here is a pic of the spark plug. Do I need a special tool to remove the plug to conduct the tests like you suggested? 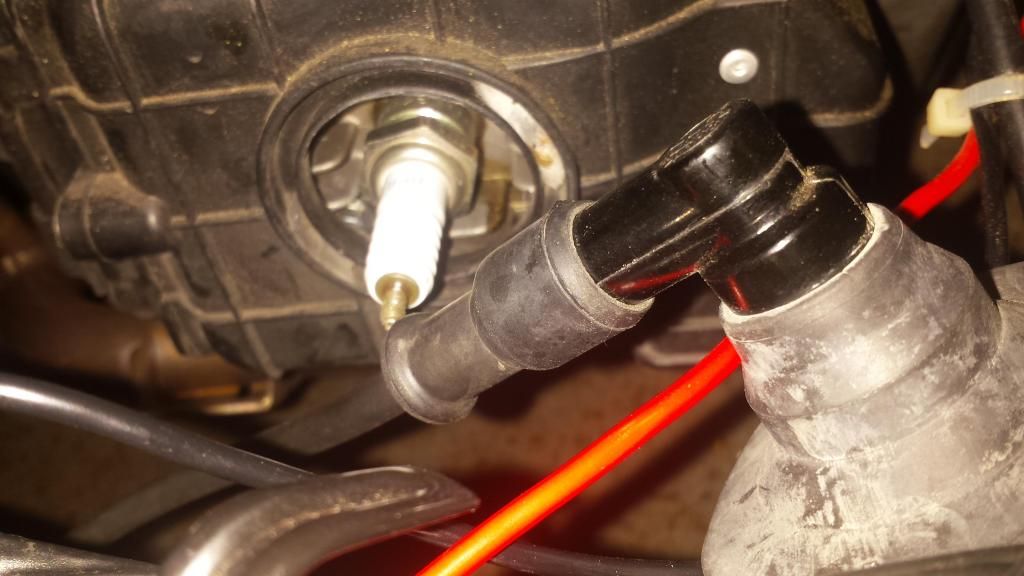 |
|
|
|
Post by Bashan on Aug 14, 2014 23:30:19 GMT -6
It's one of these, probably the 5/8", it's just a socket with a rubber liner, you don't even need the rubber liner:
|
|


 ..BAD TO THE BONE..


