


Post by Bashan on Dec 25, 2010 7:02:04 GMT -6
- The clutch pad assembly is the disc that sets on top of your torque spring. There are three arms that pivot outward on axles as RPMs increase and engage with the clutch housing, or bell, that drives the scooter. Stronger tensioner springs hold the arms in longer until a higher RPM is reached. This gives you a better "hole shot" although a bit more abrupt take off. Weaker springs allow the arms to engage at a lower RPM making for a smoother, albeit less dramatic, take off. Here you can see a cluth assembly sitting upside down on top of the pulley which I find makes for a handy little work station for some of the tasks:

- You can also see the moulting plate that has the axles for the clutch arms to pivot on, the retaining plate that holds the arms on, and the arms themselves with the clutch pads.
- I have two clutch pad assemblies for my scooter. One from MonsterGY6 that has medium tensioner springs with high quality clutch arms and pads. My stock arms have small pads in comparison and weaker tensioner springs. My desire is to combine the two using the quality MonsterGY6 components with the weaker stock tensioner springs. I enjoyed the hole shots for a while but now I'd like a smoother take off.
- Here, a clutch arm from MonsterGY6 is sitting on top of the stock. The red dots show you how much wider the quality pads are. This makes not only for better engagement, but longer pad life as well:

- One of the major problems with changing the arms on a clutch assembly is the tensioner springs that hold the arms together. As you can imagine they must be extremely strong to control the outward movement of the arms. This makes getting them on and off very problematic. So I altered a tool I bought at Lowes to help facilitate their removal and installation. The tool is actually for circlips but works quite well for the tensioners with a little modification. The tool can easily be put back to it's original form and used again as a circlip tool:

- It was $14.95 and came with four interchangeable heads for different size clips and reaching situations. The head I found worked best was the one with a 45 degree bend in it. This seemed to provide the best wrist angle for getting under the ends of the springs. The problem was that using the tool as it was designed would not open it far enough to get the spring ends into their retaining wells. So what I had to do was put one side of the jaws on as it was intended, and put the other one outside of the handle stud:

- So now we have a tool, let's get the stock clutch pad assembly apart. The first task is to remove the retainig plate that holds the arms down. This is held on by the round e-clips that do not have holes, so I couldn't have used my new tool even if I wanted to!

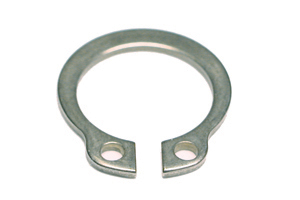 These often mis-labeled guys are e-clips, while the one here on the right is a circlip
 - The circlip tool will find its use in a few moments. The e-clips come off easily with a thin flat blade screwdriver and needlenose pliers. Here you'll notice turning the clutch pad assembly upside down and using the clutch nut to hold it to the pulley makes a convenient work station:

- And the retaining plate comes off easily:

- Now it's time to remove one of the retaining springs that have caused so much blood loss and cursing over the years. We need to get one end of our homemade tensioner spring tool under each end of the spring as indicated by the red arrows. The red arrows also indicate the potential blood you could experience without the tool!

- Here's the tool with the jaws positioned to open up the spring. Excitied? ME TOO! This is better than curling!

- Now we sqeeze the handle and the jaws open the spring:

- Always lift the long end of the spring out, what you're looking at on the right in the photo:

- The spring (red arrow} is out of the retaining well (black Arrow) and the tool (green arrow) is pulled back. The spring is now free and can be removed:


- With the three springs removed you can now lift the arms off of the mounting plate. Take note of the rubber grommets, sometimes they stick up in the arm when you take it off. Be careful! Don't lose them. Inspect the arms and pads to make sure there are no cracks or defects. Some like to roughen the slick parts on the pad with course sandpaper or emery cloth for a rougher surface. Also make sure the pads have not worn down too far.

- Inspect the mounting plate itself for cracks. If the center hole is getting too beat up from numerous clutch excursions, you might need to replace it. Also check the mounting plate axles to make sure they're not bent and the clip groove is still viable:

- Now it's time to reassemble the arms on the mounting plate with the lower tension stock springs. Some like to put a LITTLE high temperature lithium grease on the axles if they seem a bit sticky. However, caution should observed here as grease can get on the pads and lubricate a part that doesn't need lubricated. If the arm rotates freely, skip the grease. When you reassemble the arms, make sure you fit the rubber grommet into its niche in the arm and it fits tightly.

- Now use your tool and pop the hook into its well:


- Sometimes, the end of the spring hook will catch on the lip of the mounting well:

- Rather than start over with the tool, tap the spring with the end of a large screwdriver or wooden tool handle:


- After the three springs are securely installed, install the retaining plate:

- Now you can use the Scooter Doc GY6 Torque Spring Device to install the clutch pad assembly on the pulley and you're ready to mount it on the rear axle!
- Here is a video showing the tensioner spring tool in use. I KNOW......I KNOW! It's a circlip tool NOT a c-clip tool! Move on with your life....I'm NOT redoing the video


CLICK ON IMAGE FOR VIDEO


 . Thanks again for your encouragement. Rich