|
|
Post by royldoc on Jul 4, 2013 22:31:12 GMT -6
The gear and oil pump go inside the right side case cover. You must remove the flywheel, stator, and case cover to replace the pump. 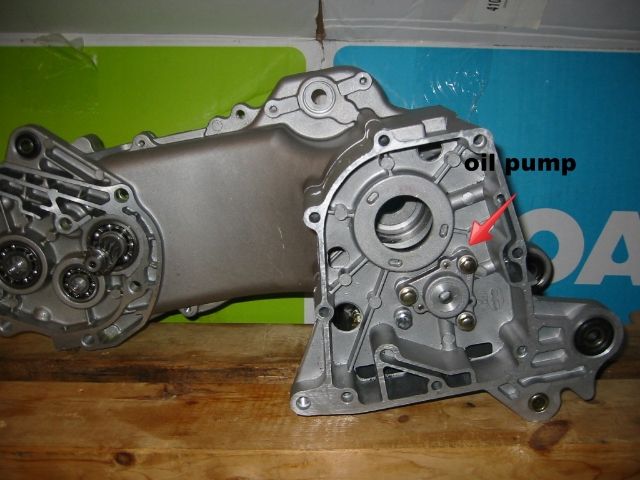 There are two different oil pumps for these engines. One uses a 22 tooth drive gear on the crankshaft and a 47 tooth driven gear on the pump. This gear is made with the gear pressed on the shaft and the shaft is inserted into the pump. The other uses a 16 tooth drive gear on the crankshaft and a 33 tooth gear on the pump. This gear is fixed to the pump shaft by a nut. These two pumps are not interchangeable. You must change the gear on the crankshaft. Also the locator dowel pins are in different locations on the two pumps. 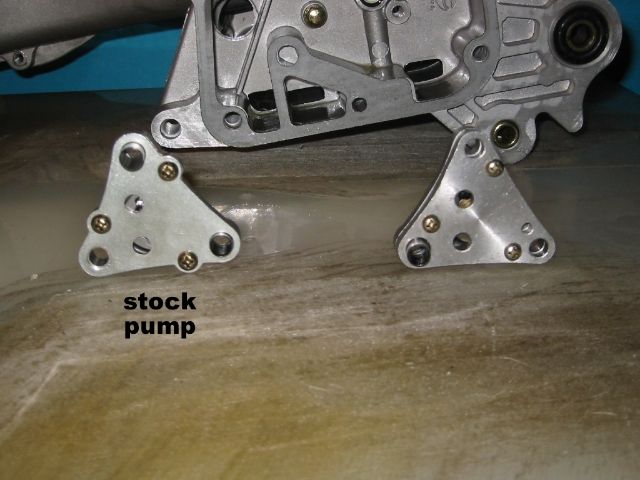 Notice the position of the dowel pins. The pump on the left uses a 47 tooth driven gear, the pump on the right uses a 33 tooth driven gear. 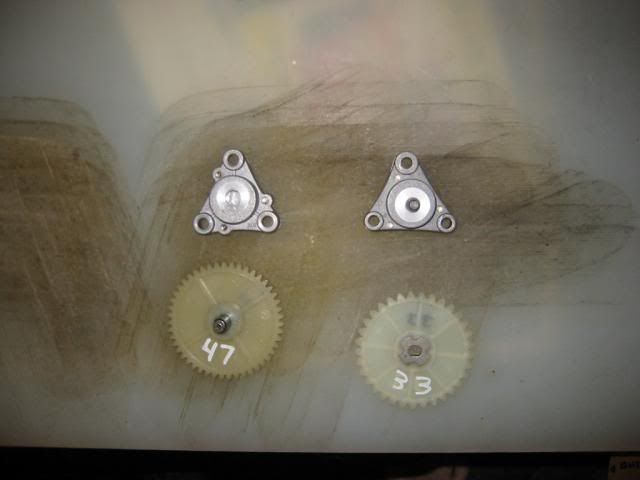 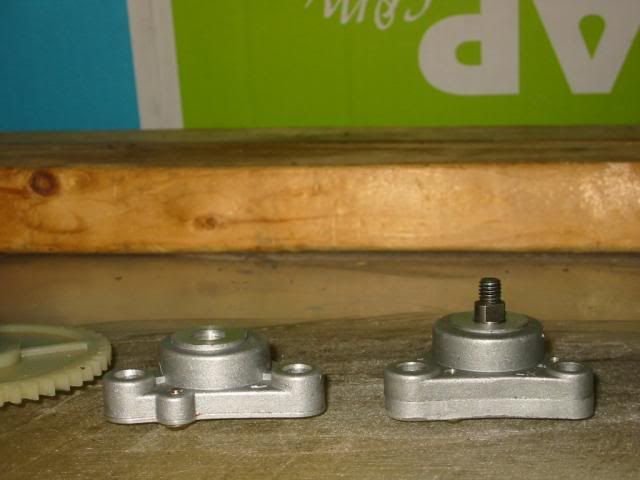 The pumps are also a different thickness Roy |
|
Certified Clinician
 
Currently Offline
Posts: 59
Likes: 0
Joined: May 25, 2013 15:07:17 GMT -6
|
Post by retardninja on Jul 5, 2013 8:44:41 GMT -6
So this is what the vendor wrote me back about my rocker arms:
About 2 years ago they started using a 69mm valve length. Prior to that all Valve Lengths were 64mm. So it really does not have anything to do with factory parts verses aftermarket. There is know way to tell what valve length an engine has until you tear it down. Some people will tell you that the 1P39QMB uses the 69mm Valve Length but that is not true, we have seen the 1P39QMB with 64mm Valve Length. The heads will interchange as long as you have the correct rocker arms to match the head, if you will look back at the original listing when you purchased you will see that it did not include rocker arms at that time, we just changed the listing and started adding the rocker arms to the kits a couple days ago because of this so that know matter which valve length the engine has customers will be able to use the kit no matter which valve length they have.
We will send you out a set of rocker arms today at no cost that is not a problem, thanks for your business and check back with us if you need anymore parts.
Thanks Joe
|
|
Certified Clinician
 
Currently Offline
Posts: 59
Likes: 0
Joined: May 25, 2013 15:07:17 GMT -6
|
Post by retardninja on Jul 5, 2013 8:49:13 GMT -6
Hey Roy thanks for those instructions! I should have this fixed Monday or Tuesday night and I will post the video of the very first attempt to start it! I directly quoted you to my parts vender about the rocker arms and the above post was his response...
|
|
|
|
Post by royldoc on Jul 5, 2013 15:36:24 GMT -6
It is possible to tell what length valves are in the head with out tearing the engine down. You just have to remove the valve cover. Set engine so the piston is top dead center and measure the height of the springs above the head. 69mm valves will be 10mm above the head and 64mm valves will be 5mm above the head. You can also measure the distance between valve stems. 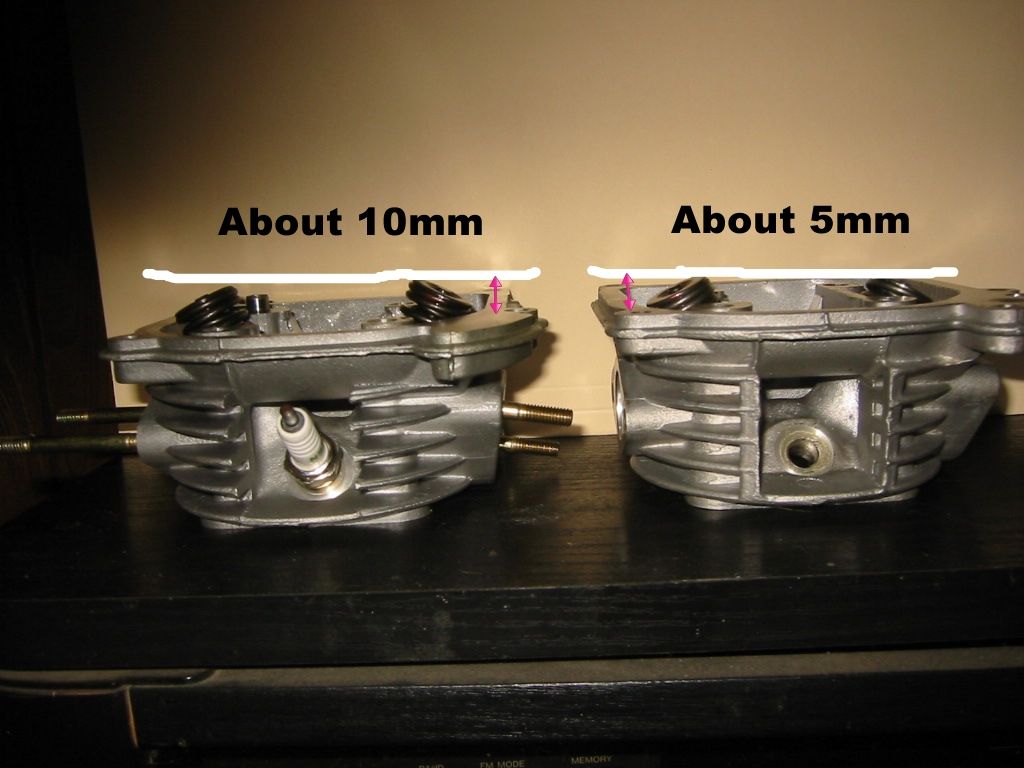 Roy |
|
Certified Clinician
 
Currently Offline
Posts: 59
Likes: 0
Joined: May 25, 2013 15:07:17 GMT -6
|
Post by retardninja on Jul 6, 2013 8:07:29 GMT -6
How would measuring the distance of my tires valve stems help me?  jk I'm pretty sure I got this handled now. But I do still have at least one more question. Is my old head still good? It looks as if it just the piston was fried. I might want to buy another scooter and fix it but I could be just lugging around junk. The old head was 64mm and the new one was 69. Thanks again for the help! |
|
Clinician

Currently Offline
Posts: 36
Likes: 0
Joined: Jun 11, 2013 21:26:08 GMT -6
|
Post by case on Jul 6, 2013 16:32:47 GMT -6
Cool.
i thought i was crazy when i tried to put my new head on and the valves did not meet the rocker arms. I guess I have a 64mm head and 69mm rocker arms.
what is the difference between the 2 valve elnghts as far as perormance and how much are rocker arms
thankz
|
|
Senior Clinician
  
Currently Offline
Posts: 212
Likes: 2
Joined: Jun 1, 2011 16:30:33 GMT -6
|
Post by cdoublejj on Jul 7, 2013 3:01:22 GMT -6
i spy an after market oil pump. is this for a 125 or 150? or is it for a 50cc, meaning there are aftermarket oil pumps for the 50cc and if so do they do a better job do they really work? Cool deal. this site is awesome. It really is the best tech help anywhere. As a matter of fact the only tech anywhere help aside from murky answers from TaotaoUSA (theres one other pretty good site scooterrebels but the responses are really slow so it's almost useless if your truly trying to accomplish something. I will stick around this site until I have hot girls to fix my scooter for me, which might happen tomorrow so this might be the last you hear from me and my lottery millions. Thanks for your help. I say that so much it seems kinda hollow, but dammit I'll post a video of the hot girls fixing my scooter to pay you all back. I never understood why there is scooter doc AND scooter rebels, they look like they both have the same styled forums and back end, almost if they were owned by the same person. if the two were to join there would be more overall traffic. |
|
Certified Clinician
 
Currently Offline
Posts: 59
Likes: 0
Joined: May 25, 2013 15:07:17 GMT -6
|
Post by retardninja on Jul 7, 2013 10:24:46 GMT -6
|
|
Certified Clinician
 
Currently Offline
Posts: 59
Likes: 0
Joined: May 25, 2013 15:07:17 GMT -6
|
Post by retardninja on Jul 7, 2013 14:28:20 GMT -6
Okay this is where I was but now Iv'e moved on to the oil pump. All the roller weights are in, and the crank case is put back together.
|
|
|
|
Post by Alleyoop on Jul 7, 2013 15:35:34 GMT -6
The carb you bought has the DRAIN HOSE ATTACHED the carb and that carb has a screw next to it to drain the bowl. The hose you showed wrapped in wire is for your old carbs BOWL DRAIN HOSE and if you look at it, it has the drain screw on the end of it.
The pump your calling fuel pump is your OIL PUMP the TRIANGLE PIECE.
Alleyoop
Alleyoop
|
|
Certified Clinician
 
Currently Offline
Posts: 59
Likes: 0
Joined: May 25, 2013 15:07:17 GMT -6
|
Post by retardninja on Jul 13, 2013 8:49:31 GMT -6
I have put everything back together except the plastics. Of course when I tried to start it the battery went dead immediately, and it never started.I have made another video of how I reconnected the fuel lines. Please have a look as I would be here all day typing to exlaiin all this.
The exhaust rocker is too close to set the valve at .003, the best I could do was .005. I guess I can file it if I need to.
Also, I have no idea how to "set" my carburetor
|
|
Clinician

Currently Offline
Posts: 34
Likes: 0
Joined: Jul 10, 2013 21:32:10 GMT -6
|
Post by xing150 on Jul 13, 2013 16:10:02 GMT -6
Make your life WAY easier.....ditch all that emissions crap.
Tovget it to start, all you need is the vacuum line from the intake manifold (infront of the carb) to the "T" fitting, the "T" fitting to the fuel pump (to draw vacuum to open the fuel diaphram), the other place on the "T" fitting going to the other side of the carb for the ACV valve (to run the needle valve in the velocity stack).
From the fuel pump you need to have the line from the bottom of the fuel tank with the fuel filter on it running to the pump, then from the pump back to the carb. That's it for getting it to run. I hope this is helpful.
The line from the top of the fuel tank can be left open to atmosphere, it just vents the fuel tank so fuel can flow out. Put a fuel filter on it and zip tie it up high to keep crap out of it. Same with the line off the rocker cover breather line. Rest of that crap can go in the garbage.
I hope this is helpful, otherwise I'll make my own vid for ya and try to get it up for you too look at. You have pretty much identical set up as i have on this scoot.
|
|
Clinician

Currently Offline
Posts: 34
Likes: 0
Joined: Jul 10, 2013 21:32:10 GMT -6
|
Post by xing150 on Jul 13, 2013 17:58:08 GMT -6
here's a video of the lines:  may make more sense for ya |
|
Senior Clinician
  
Currently Offline
Posts: 212
Likes: 2
Joined: Jun 1, 2011 16:30:33 GMT -6
|
Post by cdoublejj on Jul 14, 2013 0:41:57 GMT -6
" removing the emission crap" was the dumbest thing i did, all it is is a breather hose going to a canister which which connecters into the intake to recirculate oil vapors and a gas tank vapor recirculate that puts the fumes from the gas tank in to the intake.
it doesn't rob any power and helps boost mpg. real power comes from compression and timing (i don't mean JUST ignition timings).
|
|
Certified Clinician
 
Currently Offline
Posts: 59
Likes: 0
Joined: May 25, 2013 15:07:17 GMT -6
|
Post by retardninja on Jul 14, 2013 7:37:48 GMT -6
Xing thank you for posting the video. After taking off all that crap at least I can see what I'm doing. As you can see, I have a cheap little fuel diaphragm that doesn't look like yours. Trying to follow the simile Water flows down hill" did not work work in this case. It made no sense at all where the lines were going and how the fuel got to the carb. Anyways I have taken a bunch mor pics and yet another videobecause I am still thouroughly confused about which ports are which, especially on the fuel pump. I've looked for a diagram but can't find one.     and finally the video... Once again I appreciate all of your help. cdoublejj- at this point I would love to waste fuel lol. I just want it to finally start. This has been going on for 2 months. I still haven't got to the part where I know how to adjust the carb's air or what ever. I can't believe I haven't just said screw it and paid somebody to fix it. I've considered buying a new fuel pump just so it looks like everyone elses and I can follow along easier. |
|

