Senior Clinician
  
Currently Offline
Posts: 130
Likes: 2
Joined: Dec 13, 2011 2:27:16 GMT -6
|
Post by new2scooters on Mar 20, 2012 18:17:28 GMT -6
I change my belt every spring and sand the pulleys with 200 grit emery cloth and deglaze the brake pads and clutch bell...Keep the old belt as a back-up...belts are useless after about 3 years the rubber dries out... OK, maintenance timeline is noted and I certainly thank you for your input. Bill |
|
Senior Clinician
  
Currently Offline
Posts: 130
Likes: 2
Joined: Dec 13, 2011 2:27:16 GMT -6
|
Post by new2scooters on Mar 20, 2012 5:43:51 GMT -6
The belt can squeek and the pads can squeek if they get glazed. If everything looks and operates OK I wouldn't worry about it except for normal maintenance. Rich Thanks for the reply. What exactly is "normal" maintenance? What and when.....? Bill |
|
Senior Clinician
  
Currently Offline
Posts: 130
Likes: 2
Joined: Dec 13, 2011 2:27:16 GMT -6
|
Post by new2scooters on Mar 19, 2012 18:50:10 GMT -6
I had a "squeek" in the rear clutch of my QMB 50cc engine. I pulled the CVT to investigate but didn't really see anything broken or unusual. Bearings seemed smooth, not gritty, shoes were worn but still had pads, etc...I did put a little grease on the needle bearing rollers and lubed the clutch shoe pivots/springs to see if it would help but it didn't so I replaced the CVT with a new unit and the "squeek" is gone so obviously something was worn out.... My question is do I need to routinely service the CVT needle bearing with grease? If so, how often is recommended?
Thanks
|
|
Senior Clinician
  
Currently Offline
Posts: 130
Likes: 2
Joined: Dec 13, 2011 2:27:16 GMT -6
|
Post by new2scooters on Mar 17, 2012 13:21:29 GMT -6
Beautiful Job! Greatly simplified! Thanks for taking time to do this!
|
|
Senior Clinician
  
Currently Offline
Posts: 130
Likes: 2
Joined: Dec 13, 2011 2:27:16 GMT -6
|
Post by new2scooters on Mar 15, 2012 20:27:39 GMT -6
Thanks to all who replied. It is appreciated.
|
|
Senior Clinician
  
Currently Offline
Posts: 130
Likes: 2
Joined: Dec 13, 2011 2:27:16 GMT -6
|
Post by new2scooters on Mar 14, 2012 23:04:24 GMT -6
Is this a vent line or is it a vacuum line that needs to be hooked up? (GY6 50 cc engine) Thanks Bill 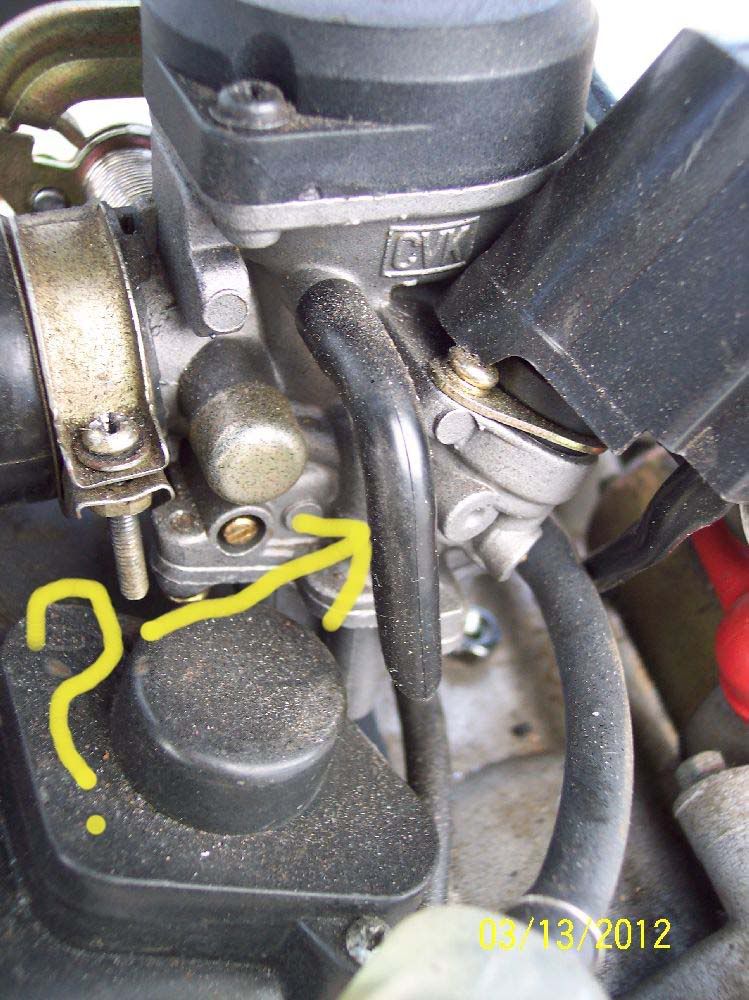 |
|
Senior Clinician
  
Currently Offline
Posts: 130
Likes: 2
Joined: Dec 13, 2011 2:27:16 GMT -6
|
wiring
by: new2scooters - Mar 14, 2012 21:00:07 GMT -6
Post by new2scooters on Mar 14, 2012 21:00:07 GMT -6
I'm not trying to be nasty but I would be glad to assist you step by step only if you're willing to take the body panels off, strip all the old wires, and hard wire it from scratch. I'm not going to try to figure out what's what on a Chinese harness. It's not difficult to wire them and if you really want to clean things up that's the way to do it IMO. Thanks. I started today by eliminating some of the wiring up front under the nose of the scoot. I am also having a starting issue....(prior to me messing with my scooter today) I did add a new starter relay and a new starter switch. Still not starting. But when I test the plugs with a light tester its clear that the power is there and that I can control it with the switch. So I'm not sure why its not working......I can jump the relay by connecting the terminals and it works.... So I have an issue in my wiring... Well what I am wanting to accomplish is to clean up the entire wiring system and only have headlights and brake lights and the ignition system. As well as make my harness more accessible, instead of having to pull apart the front fairring to get to it. I was either thinking in the glove box or under the floor mat, in the opening next to my battery box. That option IMO seems more easier, since if something goes wrong I can easisly get to it and also replace a wire or anything with out having to take off all The body panels. I think I broke my fear of messing with the harness, so I think simplifying it will be easy and tough at the same time. The only thing I may need help on is if I decide to make my own harness, where can I get the plugs and everything I need to make my own harness?  I'm no expert on scooter wiring but after wiring my project scooter with a new "generic" scooter wiring harness I really have to agree with Bashen. I spent an entire day sorting the ins and outs of the new harness. The more I worked on it the more I became convinced I could do better.....Not only were there excess wires for who knows what but the color coding of the wires sometimes changed not once but twice from the front of the scoot to the back....confusing to say the least....So, I did what Bashen is suggesting that you do and that is start from scratch. My situation was a little different in that I "wanted" full functionality....ie, turn signals, etc....Wiring schematics can be confusing because a lot of times you have to figure out whether the wires connect to each other or whether they just pass over each other as indicated in the schematic. (Sometimes a connection is marked by a large dot, but not always) To help me understand this and make it easier for me to "see" their function I used a scoot wiring diagram I got online (pdf file) and then edited out the entire schematic, leaving only the switches on the diagram. This was my starting point and I added circuits in one at a time until all systems on the scoot were working. Where wires crossed each other on the diagram but didn't connect, I used an inverted U to indicate a crossing and not a connection. I used the connectors from the generic harness only because it made the process less $$ painful. I didn't want to waste the money I had spent on the replacement harness. Doing it this way, one step at a time makes the job manageable. I positioned my start relay, CDI, ignition coil, battery, and reg rectifier on a mounting plate under my seat. Everything in one place. I hope my 2 cents worth of experience on my project helps you and good luck on your project. Here is a pic of where I located the vitals: 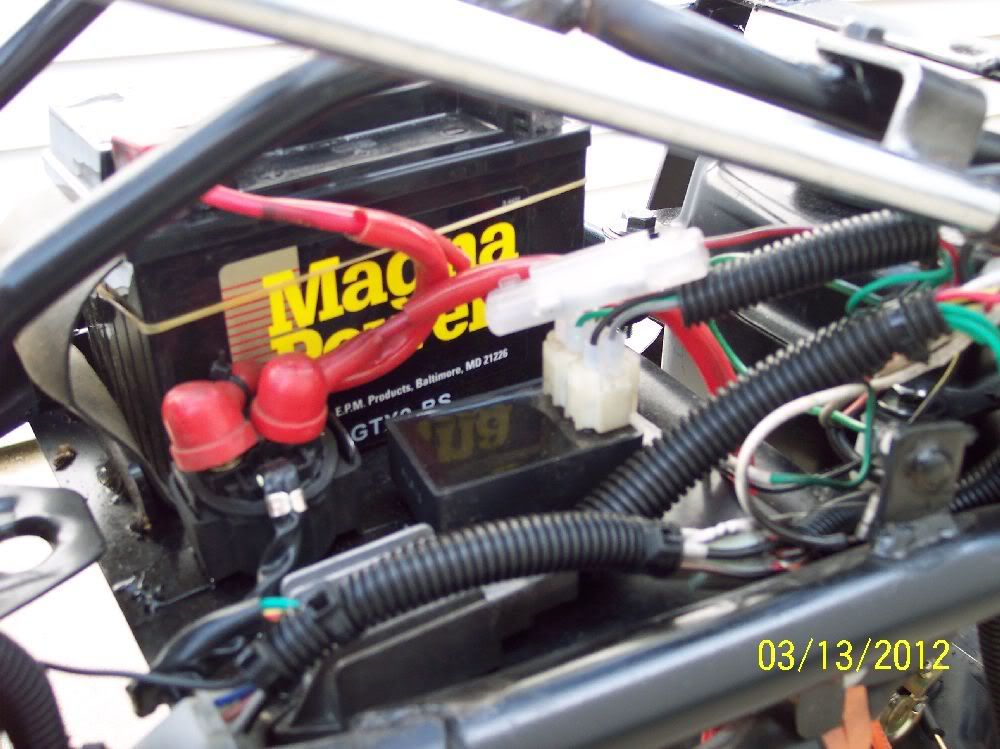 |
|
Senior Clinician
  
Currently Offline
Posts: 130
Likes: 2
Joined: Dec 13, 2011 2:27:16 GMT -6
|
Post by new2scooters on Mar 13, 2012 11:53:49 GMT -6
We have ignition  Got scoot down off of bench, oiled, fueled and with little difficulty, (needed to prime through vac line) started right up. A little carb adjusting and it was time for a road test.....I gotta admit it was the most fun I've had in years!  Give it the gas and GO! I put a couple of miles on up and down the road before putting it back in the shop. It accelerated smoothly, no vibration and I was actually amazed at the power of such a small motor..... I still have a few things to work on before it is ready for the VIN issuing inspection process. Mainly the big thing is a squeek coming from the rear of the CVT cover area so will have to get it back up on the bench and dig into that. Here is a video of it running and you can hear the squeek:  Any input on what I should be looking for/at when I get into it? Thanks |
|
Senior Clinician
  
Currently Offline
Posts: 130
Likes: 2
Joined: Dec 13, 2011 2:27:16 GMT -6
|
Post by new2scooters on Feb 27, 2012 22:13:44 GMT -6
Project update: I ran into fitment difficulties with the body plastic so I had to re-do my seat mount. This time I installed the cladding and worked from the outside in.....If at first you don't succeed......  Hinge and latch portion are done but still need to fab and install the center support and anchor the luggage carrier into it. Also still remaining to fab is a small cover to the open floor pan area, a mullion filler strip for the body panel joint and mount the inner rear fender. 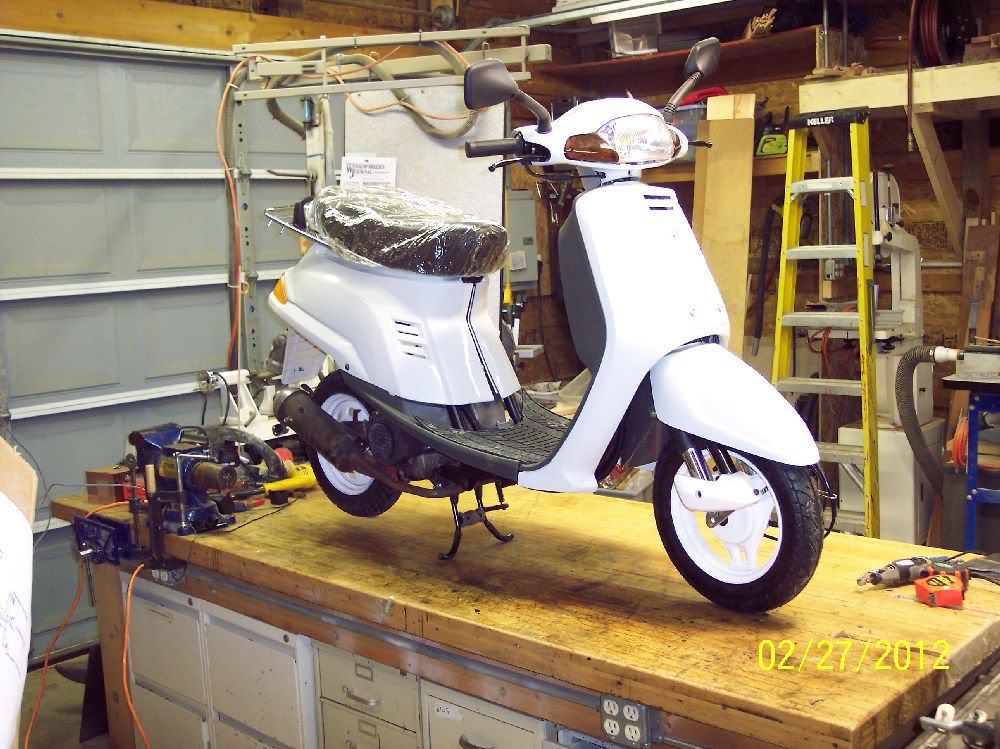 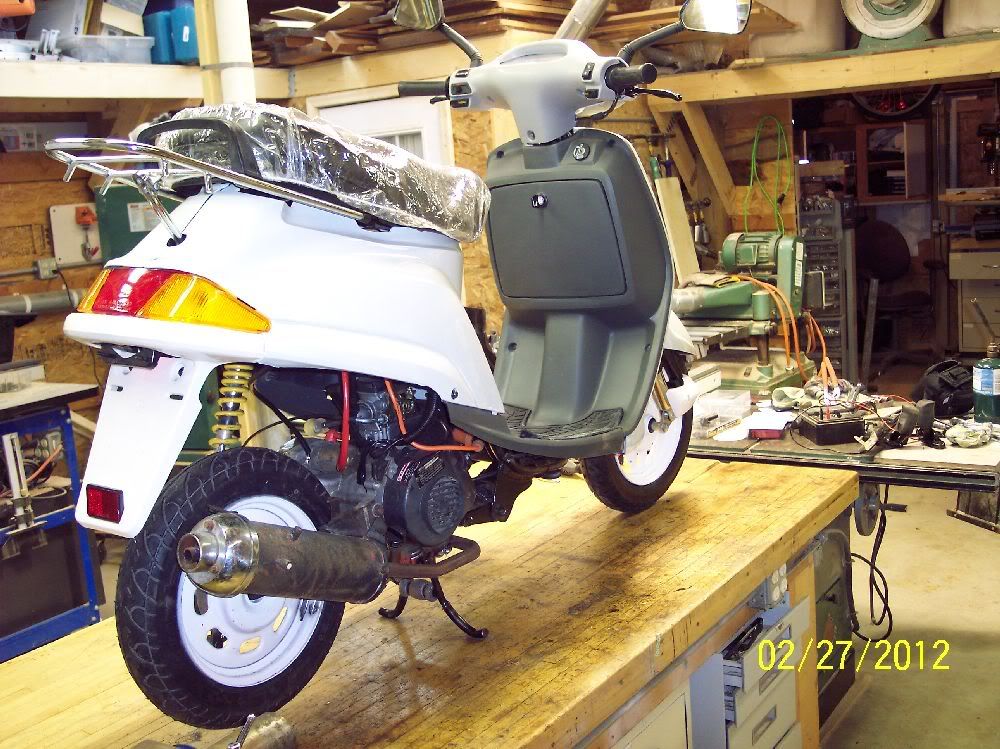 |
|
Senior Clinician
  
Currently Offline
Posts: 130
Likes: 2
Joined: Dec 13, 2011 2:27:16 GMT -6
|
Post by new2scooters on Feb 19, 2012 22:35:35 GMT -6
That is awesome!!!!! Looks great!!!! You have done an excellent job with that. No pun intended but just some constructive criticism, that seat sits up very high. I'm sure there might be a reason for it but just saying... so how much are you going to sell your works of art for? Thanks for the compliments. The rear of the seat is at stock height as I used the mounts that were already there. The front of the seat is 1" higher than stock height simply because I thought it looked better that way. It probably wouldn't suit a very short rider but it was a design feature that I thought needed to be implemented......At this point I'm unsure of a price point....Because it is a "one of", there are no economies of scale to factor in which normally help to keep the costs down..... My next build, (Yup, got 3 more in the crates, just waitin....) may be along the line of the old Cushman Eagle scoots....open frame, metal floorboard, sprung seat, exposed engine, etc....Been toyin with a lot of different ideas as this build has progressed..... |
|
Senior Clinician
  
Currently Offline
Posts: 130
Likes: 2
Joined: Dec 13, 2011 2:27:16 GMT -6
|
Post by new2scooters on Feb 19, 2012 10:26:53 GMT -6
I think you got hosed. I've gotten AGMs from YUSA that I had to activate by adding acid, charging, and sealing. That battery you have appears to have standard fill holes on top like a conventional acid battery. I've never heard of taking it to get it filled with acid if it won't charge. If it needed acid it should have been shipped with the acid including instructions on how to add it and charge. What kind is that anyway? Rich Thanks for the reply. I am inclined to agree with you on the getting hosed part....It doesn't make any sense to ship a battery dry if it needs acid before it will work correctly....then again, the battery came from T-MOTORSPORTS.......so I guess that makes perfect financial sense for them. The battery is their personal house brand, TMS....I now regret not including the battery along with the new engine when I returned it for being incomplete..... Since you have been the recipient of a dry battery in the past, I'll gamble a few dollars and get the battery filled with acid and see if it corrects the problem. After the fiasco with the engine and T-MOTORSPORTS I have long since put them on my "list" of places NOT to do business with. This has totally sealed their fate with me. Thanks again for your input. |
|
Senior Clinician
  
Currently Offline
Posts: 130
Likes: 2
Joined: Dec 13, 2011 2:27:16 GMT -6
|
Post by new2scooters on Feb 18, 2012 21:41:40 GMT -6
I purchased a new AGM battery for my scooter project but I have concerns about it.....It doesn't want to accept a charge. This is one of those multi-position batteries. What I am questioning is the battery appears dry.....It is a sealed maintenance free type battery however a label on its top says if it is not charging to take it to a battery shop and have it filled with acid....Anyone run across this issue and if so, did acid correct the problem? I would have sent it back but I purchased it 60 days ago and it only comes with a 30 day exchange policy....  Thanks 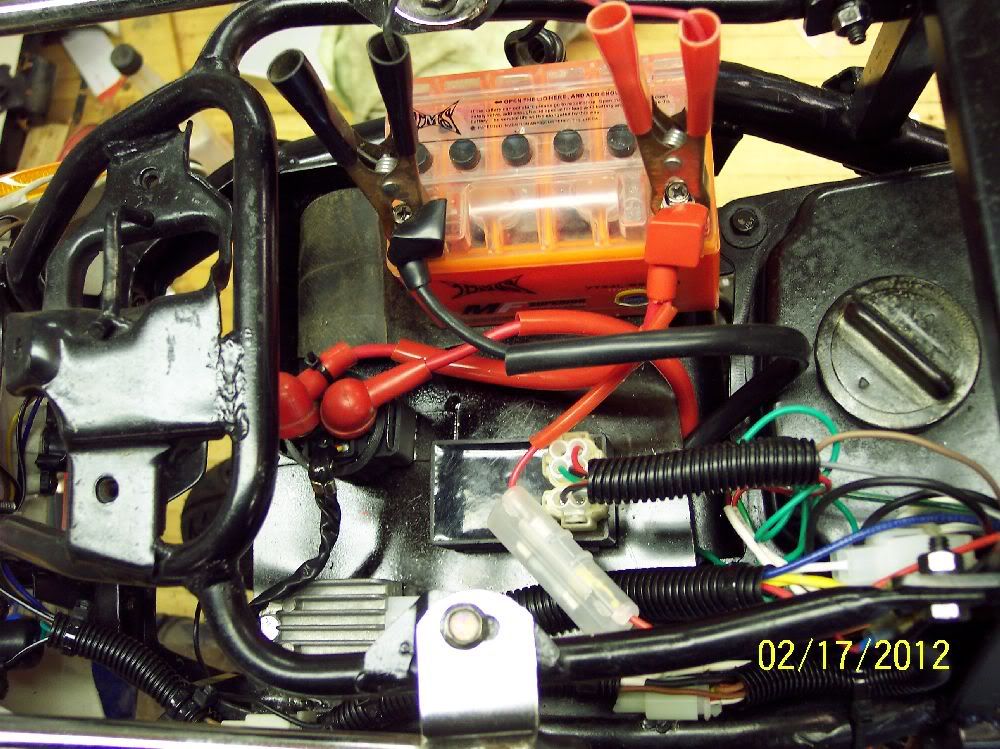 |
|
Senior Clinician
  
Currently Offline
Posts: 130
Likes: 2
Joined: Dec 13, 2011 2:27:16 GMT -6
|
Post by new2scooters on Feb 18, 2012 21:28:36 GMT -6
Gas tank mounting is complete and wiring is done: 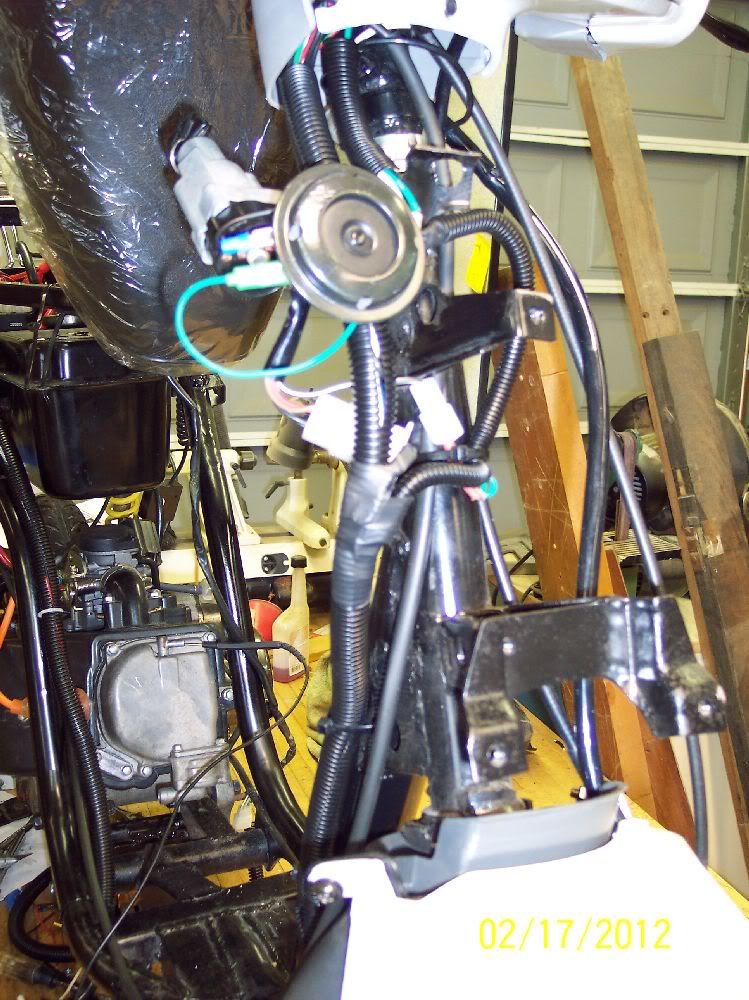  Start of body plastic installation. Floor pan opened to compensate for widened frame: 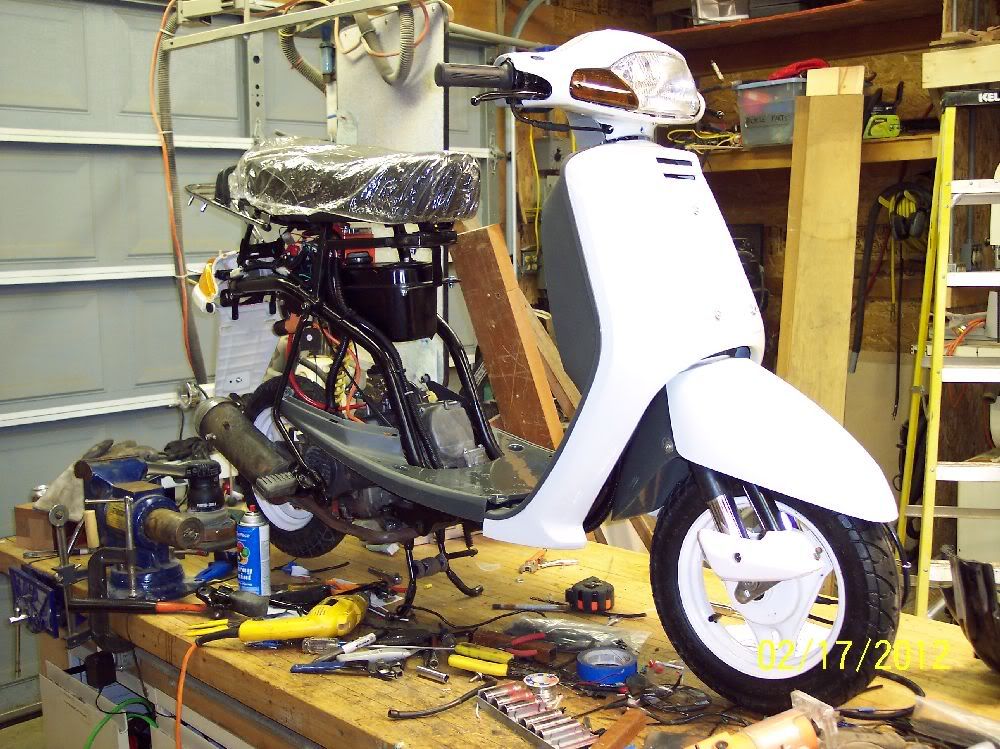 Still need to get heat resistant paint for exhaust. |
|
Senior Clinician
  
Currently Offline
Posts: 130
Likes: 2
Joined: Dec 13, 2011 2:27:16 GMT -6
|
Post by new2scooters on Feb 10, 2012 4:54:34 GMT -6
whats that for the gas tank? I found a rectangular shaped scooter gas tank on ebay that fit nicely in the space I had available. The tank on the donor scooter was trapezoidal shaped and just wouldn't fit.... Wiring is progressing nicely. I purchased a generic wiring harness hoping it would be similiar enough to use as is but after working most of the day sorting out the wires I decided to go another route. There was just too many wires that were unused and creating clutter so I unwrapped the harness to get the individual wires and connectors out that I needed and went that route. I'll be gone for the weekend so will get back at it next week. Another day or so and wiring should be done. Hopefully it shouldn't be too much longer before the scoot is making noise  |
|
Senior Clinician
  
Currently Offline
Posts: 130
Likes: 2
Joined: Dec 13, 2011 2:27:16 GMT -6
|
Post by new2scooters on Feb 6, 2012 22:05:43 GMT -6
Most of the newer carbs have a ballast resistor built into the enricher heater coils... here is the resistor you will need if your scooter had an resistor originally OK, Thanks for the info. I am installing a new carb so I will assume it may already have the ballast resistor installed. Thanks again. |
|

