Senior Clinician
  
Currently Offline
Posts: 225
Likes: 40
Joined: Sept 16, 2013 18:11:26 GMT -6
|
Post by jerryscript on Feb 8, 2015 13:41:51 GMT -6
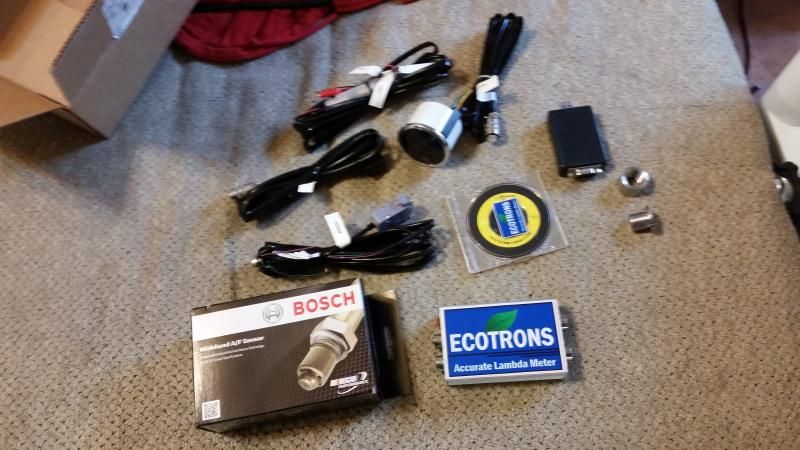
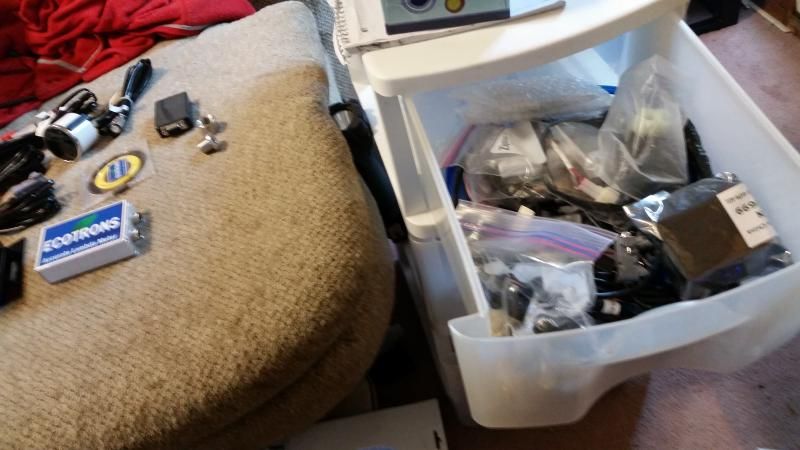
Jerry, one more thing you should consider.... You're going to have to buy connectors, you may need a 5 volt supply depending upon the meter, etc etc..... I get that you're trying to do this on the cheap, but the kit's may prove to be worth the expense, unless you're extremely confidant in what you're doing.... I have an ecotrons wideband with gauge kit, now this specific kit has accessories that will allow me to data log to a laptop or Bluetooth device.... You will not need this per se', but it does come with the gauge, bung, and most importantly, all your connectors... It's the little things like the connectors that will jack up the cost... If memory serves correctly, the terminals in the actual O2 sensor plug have resistors in them, so you can't just hack the plug off.... I'm sorry, I don't by any means want to rain on your parade.... I'm just trying to push you to open that wallet up a bit more and just buy a "kit"... I think you will have a lot less head ache and have a better end result... Now the ecotrons kit is very costly, I selected this specific kit cause I want to be able to log my data on my phone and analyze it when I get home.... Here's a pic of all the stuff that comes with it.....  I have an additional Ecotrons EFI kit that has a different O2 sensor that I'm installing on my Taida 4 valve engine.... I've got a lot on my plate when it warms up.....  I do appreciate the advice! Connectors can be plugged into with the appropriate terminal end, not a big issue, I've done plenty of re-wiring in my day, all the way back to my teenage meltdown of the main wiring harness when I installed my first stereo wrong, and the college re-wiring of the full fairing on my Honda 550, all done before the age of YouTube instructional videos. I'll look up the spec sheets on various O2 sensors to get an idea of what I'm dealing with. From what little I've perused so far, most work on pretty standard voltage outputs that associate to basic lambda values. I may even just use a row of LEDs instead of a volt meter display. I spend a lot of time researching these sort of projects before even deciding if I'll actually do it, this one looks do-able so far at reasonable costs. Once again, I appreciate everyone's advice! Here's a couple of DIY guides I've been checking out for displays: www.scirocco.org/tech/misc/afgauge/af.htmlwww.aces.edu/~parmega/efi/temp/wb/guide.html |
|
Senior Clinician
  
Currently Offline
Posts: 225
Likes: 40
Joined: Sept 16, 2013 18:11:26 GMT -6
|
Post by jerryscript on Feb 8, 2015 12:06:19 GMT -6
Does the sensor need to be right in the exhaust gas flow? I haven't purchased a sensor yet, but AFAIK they all do. I was thinking I could cut off that EGR pipe and weld a bung on there for mounting. Not sure if I can get a proper angle, I've been informed the sensor needs to be pointed down to prevent water buildup on the tip of the sensor. Plan is to find a cheap sensor and scavenge the display from a cheap volt meter, trying to keep this below $100, kits run $150+. |
|
Senior Clinician
  
Currently Offline
Posts: 225
Likes: 40
Joined: Sept 16, 2013 18:11:26 GMT -6
|
Post by jerryscript on Feb 7, 2015 23:42:31 GMT -6
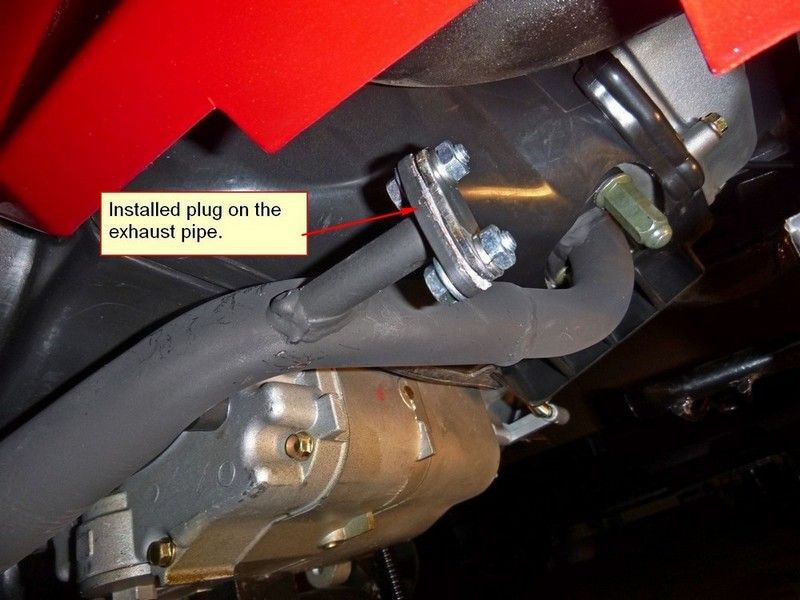
I'm thinking of giving this a try, but I don't know if it's the proper distance from the exhaust port. I believe the operating temperature of non-resistor-heated O2 sensors is 600F. Here's a pic of the closed off EGR port:  I'm thinking of scavenging an O2 sensor and volt meter for a display. |
|
Senior Clinician
  
Currently Offline
Posts: 225
Likes: 40
Joined: Sept 16, 2013 18:11:26 GMT -6
|
Post by jerryscript on Feb 7, 2015 13:30:01 GMT -6
I would by an electrolyte sponge and rubber band it to the drain tube. Check it on hot days, that's when you have a chance of boiling over.
|
|
Senior Clinician
  
Currently Offline
Posts: 225
Likes: 40
Joined: Sept 16, 2013 18:11:26 GMT -6
|
Feb. 14th
by: jerryscript - Feb 7, 2015 13:11:35 GMT -6
Post by jerryscript on Feb 7, 2015 13:11:35 GMT -6
I was thinking of getting my baby a full spa treatement, oil change, wash and wax, the works.
Ohhh, you meant my other baby, don't they carry roses at the corner store for that?
|
|
Senior Clinician
  
Currently Offline
Posts: 225
Likes: 40
Joined: Sept 16, 2013 18:11:26 GMT -6
|
Post by jerryscript on Feb 6, 2015 22:46:26 GMT -6
If you don't have one already, be sure you pick up a battery charger. New batteries come dry, so you fill them up with electrolyte (provided as described above), then put it on the charger till fully charged. I use a Black & Decker charger, many recommend the Battery Tender Jr, any name brand charger should be fine.
|
|
Senior Clinician
  
Currently Offline
Posts: 225
Likes: 40
Joined: Sept 16, 2013 18:11:26 GMT -6
|
Post by jerryscript on Feb 6, 2015 21:47:20 GMT -6
You could just forget the electric start and go with a bio-start system like what I have inside my flywheel:  |
|
Senior Clinician
  
Currently Offline
Posts: 225
Likes: 40
Joined: Sept 16, 2013 18:11:26 GMT -6
|
Post by jerryscript on Feb 6, 2015 8:42:44 GMT -6
Definitely pull that brass cap, like cyborg said it's very easy, just pierce with a drill and use a screw to pull it out. This exposes your air/fuel mixture screw, which will allow you to tune your carb. During the winter, you'll usually need that screw turned out 1/4-3/4 turns compared to the summer (cold air is denser, so the perfect ratio needs more fuel in the winter). I had been told this by Alleyoop in the forums when I was installing my first BBK and jetting the carb to match a couple of years ago, and it was proved to be true a month later when the temps dropped. I had jetted too rich without realizing it, and all of a sudden I had more power throughout the engine's range. Point I'm trying to make is that being able to adjust the air/fuel mixture screw makes a huge difference in your engine's performance. It takes a few times to get it down, but follow Alleyoop's 4TS tuning guide, and you'll be grinning ear-to-ear when you ride! |
|
Senior Clinician
  
Currently Offline
Posts: 225
Likes: 40
Joined: Sept 16, 2013 18:11:26 GMT -6
|
Post by jerryscript on Feb 5, 2015 23:44:27 GMT -6
I would be suspicious of the wires coming from the stator (perhaps the stator itself).
|
|
Senior Clinician
  
Currently Offline
Posts: 225
Likes: 40
Joined: Sept 16, 2013 18:11:26 GMT -6
|
Post by jerryscript on Feb 5, 2015 21:19:00 GMT -6
You are probably right about a loose connection. A simple one to check first is the spark plug boot and wire. I spent a month last year thinking I had a fuel/air issue due to bogging and dying and having trouble electric starting. Turned out my spark plug boot was bad (one of those rip-off performance coil/boots), I put the stock one back on and haven't had the issue since.
|
|
Senior Clinician
  
Currently Offline
Posts: 225
Likes: 40
Joined: Sept 16, 2013 18:11:26 GMT -6
|
Post by jerryscript on Feb 5, 2015 1:27:39 GMT -6
The lines to the T connector with a cap on one end, that looks like one of the lines comes from the intake manifold, it should then attach to the fuel petcock. That vacuum line is what actuates the fuel petcock allowing fuel to flow through it. Is it hooked up?
|
|
Senior Clinician
  
Currently Offline
Posts: 225
Likes: 40
Joined: Sept 16, 2013 18:11:26 GMT -6
|
Post by jerryscript on Feb 4, 2015 8:34:52 GMT -6
I was on my way back from a ride when my scooter died. Seen i had gas flow was gonna check spark and i seen that the spark plug wire came apart. Are they suppose too? i seen a spring and what looked like a mini fuse thing in the boot? I put it back together and it fired right up. Time for a new wire? Or are they made to come apart? They can be taken apart and reassembled. If one is coming apart on its own, I would replace it. |
|
Senior Clinician
  
Currently Offline
Posts: 225
Likes: 40
Joined: Sept 16, 2013 18:11:26 GMT -6
|
Post by jerryscript on Feb 3, 2015 20:17:40 GMT -6
Alleyoop, scoot, cyborg, jct842, Guitarman, tvnacman, Bashan ok.I agree with Bashan lets take it down a notch .when I said the flow was good after the fuel filter I meant when I disconnected the fuel line from the carb. side of the filter not the fuel tank side, the gas flow was fine.so the fuel is flowing from the tank down to the filter thou the filter but stops before filling the float bowl at the carb. now when I'm riding and the problem happens the filter is dry I've try'ed opening the gas cap that would brake a vacuum if there was one.(right) and I can see the bung at the bottom of the fuel tank no blockage.the only thing that works to get it going again is to blow on the vent hose or disconnect the fuel line at the fuel filter and when I do that the fuel flow is fine.now I know this sounds like a classic vent problem but opening the gas cap should brake the vacuum.It's like the needle at the float bowl is stuck and it needs a little pressure to open it and let the fuel in and fill the bowl.and blowing in the vent line gives it that little extra push. I've had the carb. off and cleaned it and adjusted the float level it seems fine.so just to put to rest the tank issue I'm going to rig up a temporary fuel tank out of a gas can and see what happens.also some one asked if the vent was still hooked up to a canister ,it is not, not even a filter till I fix this problem.now as not to get anyone mad at me if you need more info just ask me.and I'll do my best to explain myself.thank you all for your help. Scoot One small problem with your conclusion, if you are blowing into the gas vent tube, you should not be able to blow fuel past the petcock. The petcock should not allow fuel to flow unless there is suction on the vacuum actuator (unless you replaced your vacuum actuated petcock with a manual one or a straight line). You may be able to blow a bit past the petcock, but it should not flow without being actuated by the vacuum line. You need to methodically test from the tank to the carb, so get a bowl to catch the gas and do the following: 1- Remove the line from your fuel tank to your petcock at the petcock end, and see if it flows freely through the filter, if all-good then re-attach 2- Remove the line from your petcock to the carb at the carb end, now remove the vacuum line from your petcock to the intake manifold at the manifold end and suck on it, fuel should flow out the line you removed from the carb, if all-good then re-attach 3- Take apart your carb and clean it real good, paying particular attention to the float assembly. If the float assembly has ANY resistance to movement, you'll need to figure out why. If all these test seem to show everything is OK, we will move on to other issues. BTW- A few pics or a video might allow us to see something you may be overlooking, a second set of eyes never hurts when troubleshooting! |
|
Senior Clinician
  
Currently Offline
Posts: 225
Likes: 40
Joined: Sept 16, 2013 18:11:26 GMT -6
|
Post by jerryscript on Feb 3, 2015 20:03:32 GMT -6
Wouldn't regular motorcycle dealers carry 16" tires? Yes, but I was trying to help Bashan find a particular brand. There are plenty of 120/80-16 choices, but 140/70-16 is a bit more difficult to source, and Maxxis doesn't seem to carry them in the US, they only list 90/100-16 knobbies on their site. |
|
Senior Clinician
  
Currently Offline
Posts: 225
Likes: 40
Joined: Sept 16, 2013 18:11:26 GMT -6
|
Post by jerryscript on Feb 3, 2015 9:02:50 GMT -6
I've used Vinyl wraps for a lot of stuff like my XBOX, but that has always came pre-cut.... It would be a MOFO to do an entire scooter while hugging the contours and keeping at bay the air bubbles.... If you attempt it, good luck and keep us posted with pics, I would love to see the outcome! The key is two parts, temperature and time. Be sure to apply at the correct temp, or the adhesive may not set properly. Take your time, stretching and pushing with a medium/hard foam block. One of the owners of my restaurant uses vinyl wraps for advertisement on his off-road group's bikes (mostly KTMs). |
|

