|
|
Post by Cruiser on Jun 28, 2011 0:01:44 GMT -6
Your welcome, Doc. Have fun with the head gasket. At least it's the vertical cylinder which I would think is easier to work on.
|
|
Certified Clinician

Currently Offline
Posts: 81
Likes: 0
Joined: Mar 16, 2011 12:32:15 GMT -6
|
Post by philosophydoc on Jul 6, 2011 0:36:17 GMT -6
ugh... New brake switch arrived...hooked it up, and still I have brake lights on constantly. I took apart the brake handles, and it appears the problem is this: When you squeeze the brake levers, the plunger on each brake switch extends, engaging the brake lights. Releasing the levers depresses the plunger, which turns off the brake lights. Unfortunately, when I release the left handle, it does not depress the left plunger far enough to kill the lights. (When I removed the left brake handle and depressed the plunger manually, the lights went out). The problem is that my original switch (on the left in the photo below) kills the brake lights when the plunger is depressed 1/16th of an inch, while the plunger on the new switch (on the right) needs to be depressed nearly 3/16ths of an inch to work. 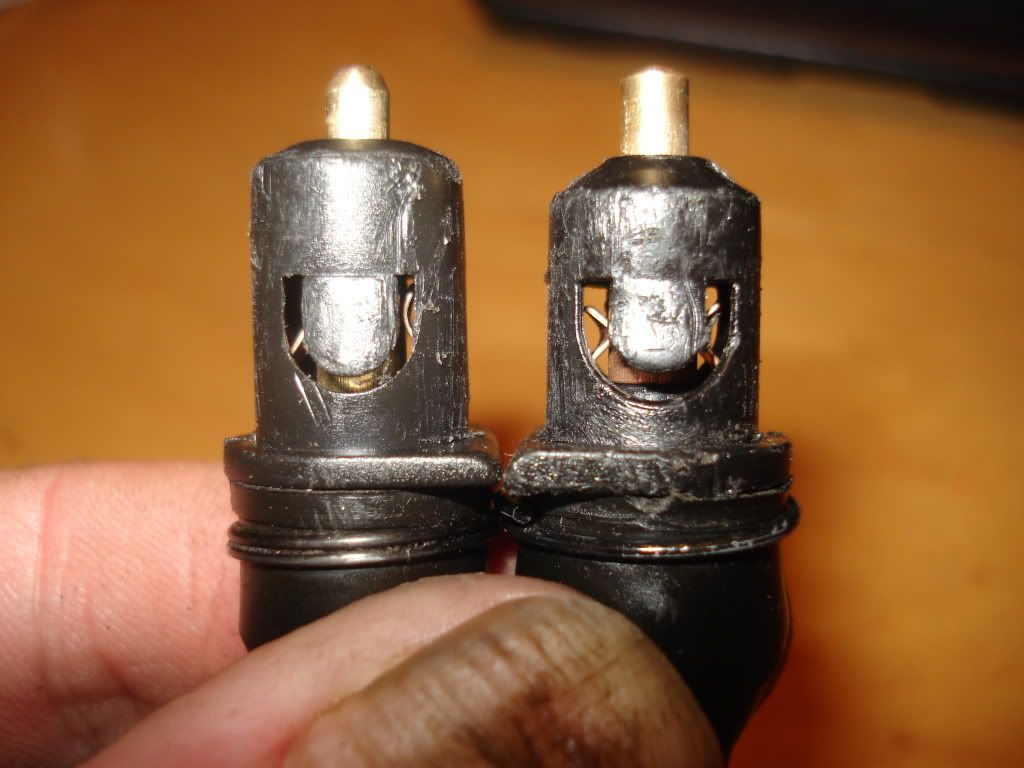 I suppose I could try to "build out" the surface of the brake lever surface where it meets plunger, but yeesh...am I missing some obvious fix here? You can see in the photo that the switch has a collar near the bottom, so I can't see any simple way to push the switch deeper into the brake handle short of grinding off the collar, but given the fixed position of the "wings," removing the collar means I need to find another way to anchor the switch. I can't really send the switch back and hope for one with a shorter throw, because it came with a molex end, which I needed to cut off to attach to my scooter. Ideas? |
|
Clinician

Currently Offline
Posts: 38
Likes: 0
Joined: Jun 8, 2011 7:39:18 GMT -6
|
Post by smokindawg on Jul 6, 2011 8:59:30 GMT -6
Maybe drill and install a sheet metal screw into the handle. You could then use a drill to make an indent in the head so that you could make adjustments till it works just right.
|
|
Certified Clinician
Currently Offline
Posts: 81
Likes: 0
Joined: Mar 16, 2011 12:32:15 GMT -6
|
Post by philosophydoc on Jul 6, 2011 10:22:03 GMT -6
Thanks, smokindawg -- I thought about that, but when all this came to a head last night at 1am, I was too tired to contemplate doing anything. First, took the switch, magic-markered the tip of the plunger, pushed it into the socket and "marked" where it contacts the brake lever. Second, removed the lever and slipped it into a vise. Used a 1/8 inch drill bit to drill a half inch deep hole. (Since the handle is aluminum, it drilled out "like butter.") Then screwed in a 8-18 x 1/2 inch self drilling hex screw. Since the contact point was slightly off center, the hex head extended a shade past the edge of the handle, so I had to grind off a bit of the hex head to allow the lever to fit into its slot. Here's the finished product, which I have tested and works fine (the ground portion of the hex head is on top in this photo): 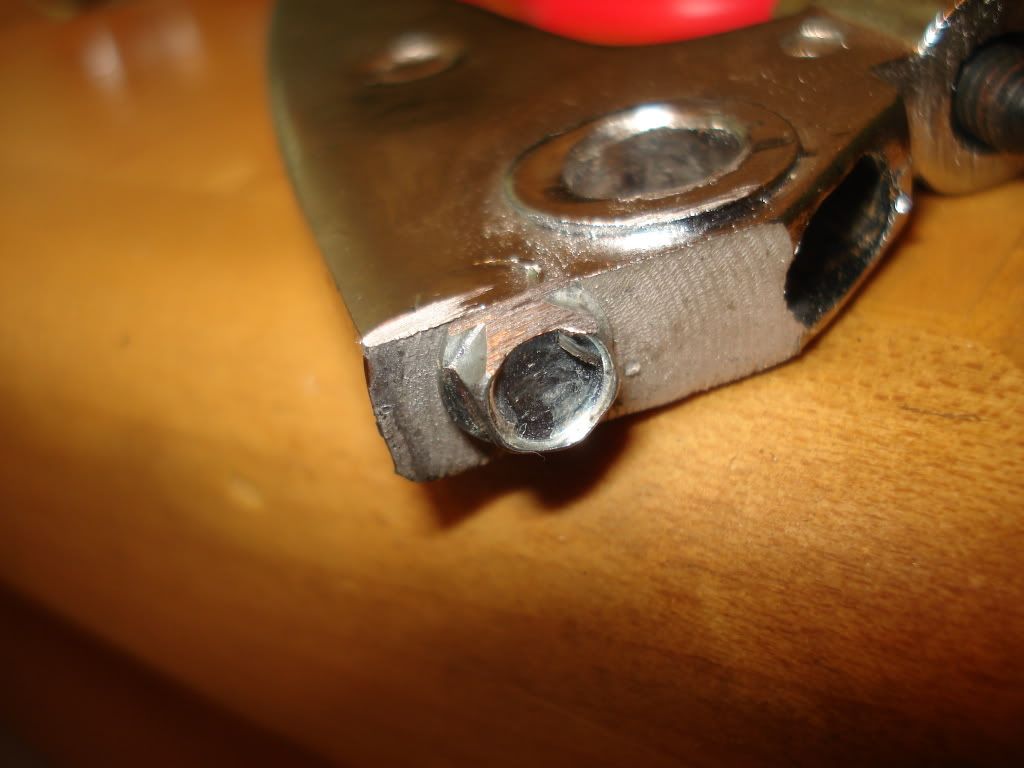 I also discovered that the plastic wings in the switch were too long, such that they did not extend into the holes in the switch housing, and hence the switch wasn't seating tightly. Took out the switch and used a dremel tool to shave them down to fit. Once I replaced the switch (and it fit snugly), the head of the hex screw was now too long, so I had to do some more grinding to make it work. But it seems to be working fine now. (I am putting up lots of photos because as a newbie, I have greatly benefited from following past threads that offered detailed descriptions and photos of various "fixes" members have engineered. My way of paying the board back...) |
|
Certified Clinician
Currently Offline
Posts: 81
Likes: 0
Joined: Mar 16, 2011 12:32:15 GMT -6
|
Post by philosophydoc on Jul 11, 2011 15:26:21 GMT -6
Just a note that I'm not abandoning my scoot -- vacation from 2-5th and time spent buying my youngest a car (he's off to college in 6 weeks) has taken up all my spare time.
Hope to replace the head gasket in the next few days, and will report back then. May take a lot of photos to help along those who might be considering replacing a head gasket themselves...
|
|
Certified Clinician
Currently Offline
Posts: 81
Likes: 0
Joined: Mar 16, 2011 12:32:15 GMT -6
|
Post by philosophydoc on Jul 12, 2011 14:55:27 GMT -6
Well, the surprises just keep coming... Starting to pull the head to replace the head gasket. 1. Removed variator cover to rotate variator to bring cylinder to TDC (top dead center). I've tried this before, but I can't make out any mark on the timing chain, so I decided to go ahead and see if pulling the cylinder cover would make it easier to see. 2. Started by pulling the breather hose (loosening the hose clamp), then removing the bolt to the air cleaner, and the oil breather tube (bolt connecting breather tube is halfway out on the right); in photo, I have also removed top left cylinder bolt as it held a hose stay in place (at 11 o'clock in photo): 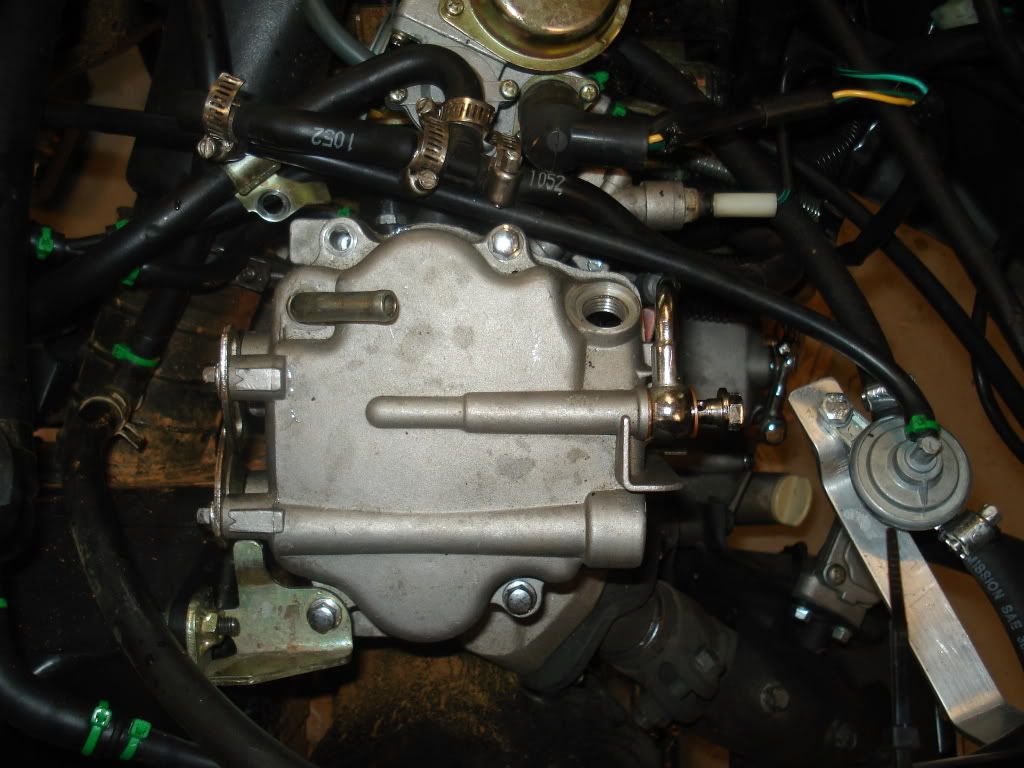 Now, pay close attention to the next picture -- all I have done is pull the cylinder cover...can you see what it missing here?  Again, the previous owner told me he had replaced the rocker arm, and put everything back together. What he seems to have forgotten are the four cylinder head cap nuts that attach the %$#*& cylinder head!!!! No wonder when I tried to crank the engine I got considerable leakage at the head gasket...darn thing wasn't even bolted on. (The reddish gunk in the photo smells like old coolant, and is what was leaking out when I initially tried to crank the engine. Any ideas on why it's there (though given that the head wasn't even attached, I gather it could have come from anywhere). I have found three of the cap nuts in the "box o'parts" that came with the scoot, but need a fourth -- does anyone know where I might purchase one? Finally, in the previous photo you will see I have rotated the cam chain such that the two smaller holes are parallel to the top edge of the cylinder head, and the large hole is straight up. Is this TDC? Thanks in advance. |
|
Scooter Doc

Currently Offline
Vstar 650 Classic
Posts: 675
Likes: 3
Joined: Apr 24, 2010 19:43:21 GMT -6
|
Post by damin69 on Jul 12, 2011 15:05:28 GMT -6
Wow you got Screwed. Ok I will try looking up some later but you may find it easier to got to local hardware to get new cap Nut as apposed to ordering. Also I notice on your picture that instead of the hex bolt button cap screw. Might want to consider removing that and checking to see if it is the correct size or if it has been cross threaded in and the wrong size.
|
|
Certified Clinician
Currently Offline
Posts: 81
Likes: 0
Joined: Mar 16, 2011 12:32:15 GMT -6
|
Post by philosophydoc on Jul 12, 2011 15:14:35 GMT -6
Am I correct in assuming that these are the cylinder head cap nuts? They do fit the threaded cylinder bolts...I just emailed scrappydogscooters to see if he can sell me one.  |
|
Certified Clinician
Currently Offline
Posts: 81
Likes: 0
Joined: Mar 16, 2011 12:32:15 GMT -6
|
Post by philosophydoc on Jul 12, 2011 15:33:50 GMT -6
Nice catch, damin69...I was so flabbergasted by the lack of cap nuts I totally missed the torx head bolt!
But perhaps my luck is changing...I did find the proper sized bolt in the box o' parts, and the thankfully the torx bolt was the correct thread size, so the old bolt fits fine. No harm, no foul...
Am I correct about TDC? (Check the photo where you found the torx head bolt to see what I mean).
And finally, if I were to use a regular (i.e. non-capped) nut here, would that be a problem? It would be a darn sight easier to find than a proper depth capped nut...
|
|
|
|
Post by Alleyoop on Jul 12, 2011 16:18:22 GMT -6
Yes, the picture looks like you at TDC, Neither of the Cam Lobes are pointing up, in that position BOTH Valves are CLOSED and that is the position where you adjust them.
Alleyoop
|
|
Certified Clinician
Currently Offline
Posts: 81
Likes: 0
Joined: Mar 16, 2011 12:32:15 GMT -6
|
Post by philosophydoc on Jul 13, 2011 14:08:13 GMT -6
Okay, does anyone see a potential problem with the following $2.06 workaround? On the left is one of the original cylinder head cap nuts (have three, missing one). On the right is a cap nut I purchased at Home Depot, along with three washers to make sure I have adequate thread depth to tighten the nut down. (Might try it with two washers, but I'd rather make sure I have enough room...nut and washers are stainless steel):  I contacted ScrappyDog, but they don't have any such nuts for sale. For anyone who may need to know in the future, correct size for cap nut is M8 (this nut is M8 x 1.25). |
|
Certified Clinician
Currently Offline
Posts: 81
Likes: 0
Joined: Mar 16, 2011 12:32:15 GMT -6
|
Post by philosophydoc on Jul 16, 2011 14:08:55 GMT -6
I finally pulled the head, and what I found isn't pretty: Here's the top of the cylinder itself: 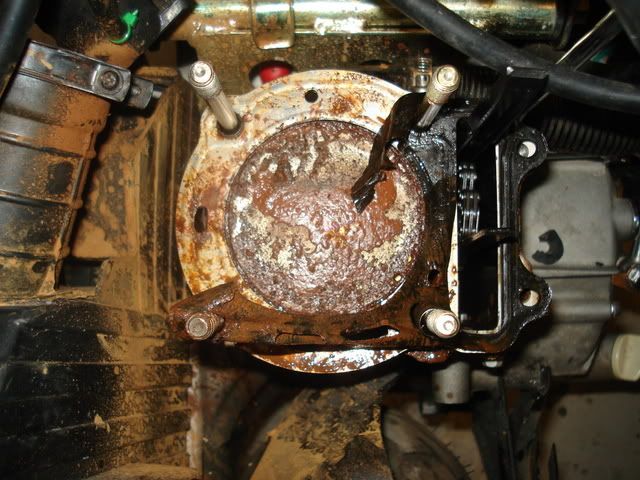 Most of the crusty stuff looks to be old radiator fluid mixed with gas (and perhaps some of the diesel fuel I dumped in there a few weeks ago to try to clean things out). What's on the cylinder head itself is fairly pliable, and can be wiped/scrubbed off. (1) My immediate question is this: what sort of solvent should I used to remove this gunk? Would Gunk carb cleaner be apprpropriate? And second, is there any sort of scrubber that I should or shouldn't use? My worry is whether taking some fine steel wool to this would mess up piston head...again what's the right product to use. Second question concerns the head gasket, which appears to be in two parts -- a metal gasket and a non-metal one that is clearly disintegrated: 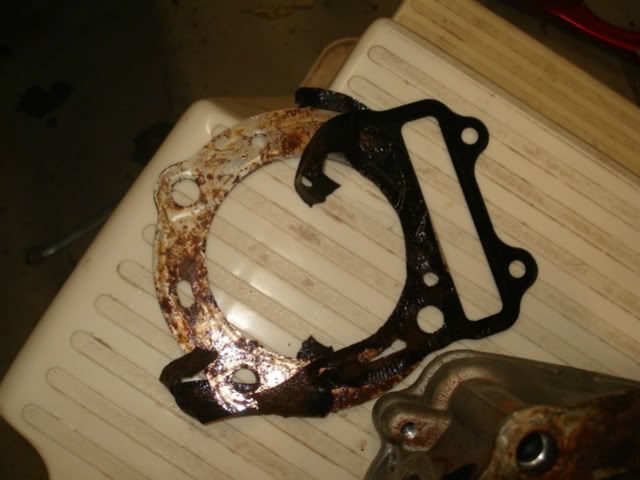 (2) I purchased a set of replacement gaskets, and I have both a metal and non-metal head gasket. Do both go on after I get this mess cleaned up? Finally, here's the underside of the cylinder head itself: 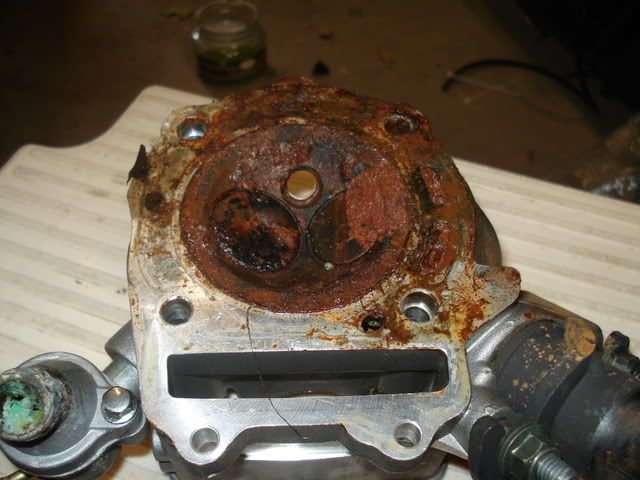 Two final questions...notice the bluish gunk clogging up the thermostat. This gunk is also is various places in the water jacket surrounding the cylinder, and clearly needs to be cleaned out. Again, recommendation on a cleaner, or a process to use? I will take the thermostat apart and check it (for now it won't come out of the cylinder head...it wiggles, but won't pull out. I gather it's because that bluish gunk is deep in there as well. Again, to summarize: (1) Best cleaner(s) to use on cylinder head and piston, and scrubbing gear that won't damage any components? (2) Best cleaner(s) and procedure to use to clean out the water jacket? Is it simpler to clean what I can see, then put it together and flush the #%*&#* out of it? (Though please note the bike has yet to start, so flushing may not be an option at this point) (3) When re-installing head gasket, do both the metal and non-metal gaskets go on? Many thanks in advance... |
|
Doc's Anything Goes
Currently Offline

Posts: 2,739
Likes: 66
Joined: Oct 23, 2010 19:29:21 GMT -6
|
Post by tvnacman on Jul 16, 2011 18:54:43 GMT -6
the plug looks like it maybe rusted , it that a water cooled bike ? if so did you use water to fill the cooling system ? diesel is a great penatrating oil (try it on a rusted or squeekie hing) and it is not flamable !!! spray it around the outside of your house keep the bugs out . John sorry for all the trouble use the diesel to loosen it up and wipe it clean , I would look to see if the head or cylinder is cracked . John |
|
Certified Clinician
Currently Offline
Posts: 77
Likes: 1
Joined: Nov 2, 2010 17:18:26 GMT -6
|
Post by Jeff on Jul 18, 2011 10:16:32 GMT -6
Diesel is a good solvent, and Gunk, or carb cleaner, or brake cleaner are all safe to use too. If you want to dissemble the components you can soak them in one of those one gallon carb cleaner solvents you get at any auto parts store. You can use a wire brush for cleaning as long as you get every trace of the wire brush particles out.
The head bolts don't need the cap nuts, no reason you can't use a regular nut and lockwasher, just get them to the proper torque. Not sure of the head gasket, but auto engines use metal gaskets so I would think you want to use the metal gasket for sure but maybe it uses both. Check the Honda service manual.
The previous owner is a moron.
|
|
Certified Clinician
Currently Offline
Posts: 81
Likes: 0
Joined: Mar 16, 2011 12:32:15 GMT -6
|
Post by philosophydoc on Jul 18, 2011 16:35:42 GMT -6
I think step one will be to pull apart the cylinder head (remove valves, springs, etc) and dunk it in B-12 Chemtool carb and parts cleaner overnight.
Will try to rotate piston to BDC tonight to see if lower cylinder block can be pulled, then I'll try the same thing with tomorrow to see if it's cracked or salvageable.
Helix manual says to use "valve spring compressor" to remove cotter pins for valves -- anyone devise a workaround?
|
|


 ..BAD TO THE BONE..
