Senior Clinician
  
Currently Offline
This trike you fly!
Posts: 166  Likes: 0
Joined: Jul 29, 2012 10:18:39 GMT -6
|
Post by new2scootn on Oct 6, 2012 19:53:53 GMT -6
Hey big daddy, daddeo, daddue! I'm sure you'll make a great decision... we've all got faith in ya brother! Just try not to get stressed and have a little fun with it...  Hmmm... now if only I could take my own advice... |
|
Senior Clinician
  
Currently Offline
This trike you fly!
Posts: 166  Likes: 0
Joined: Jul 29, 2012 10:18:39 GMT -6
|
Post by new2scootn on Oct 5, 2012 21:49:34 GMT -6
Hopefully this will help the next guy save a lot of harsh language and guesswork. Start by putting trike on center stand and removing the battery tray under the seat and setting it off to the side like in the pic(no need to disconnect it unless you want). 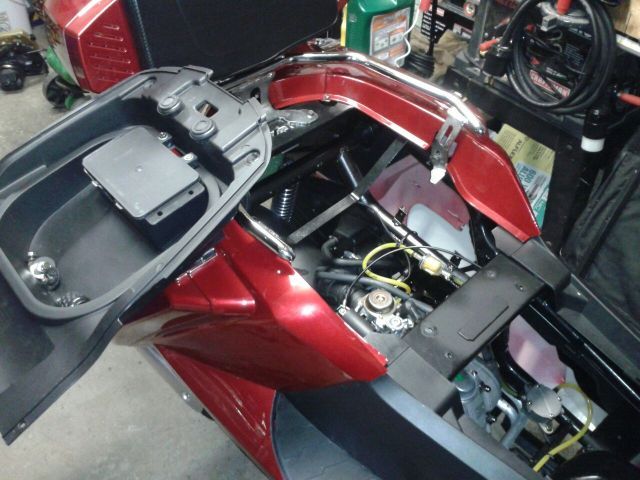 Now you can look straight down in and see the crossmember under the intake hose and the three bolts holding it in. 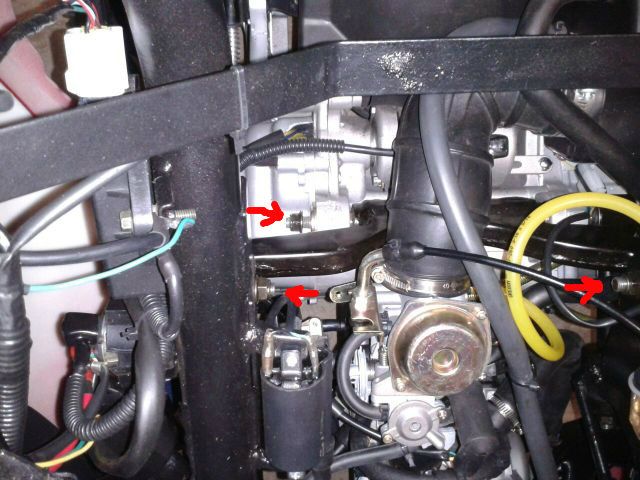 But wait, there's another bolt holdin' it too so next you want to open the left side storage compartment and remove the liner. This will give you access to the air filter cover(which has to be removed ) and easier access to the other bolt holdin' on the crossmember(a "dogbone" motor mount). 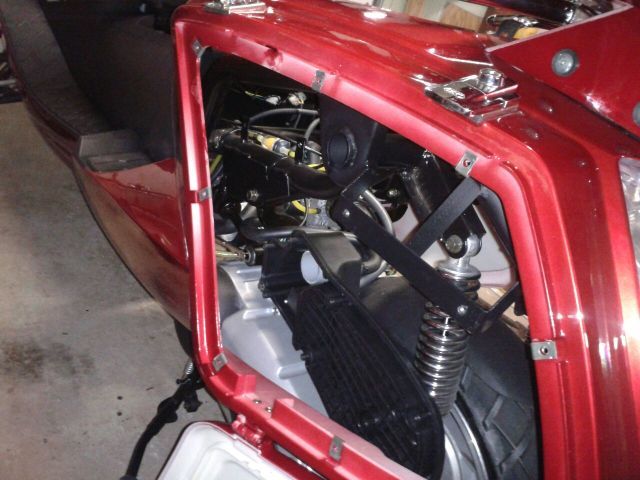 In this next pic the dogbone is circled in blue, the yellow arrow points to the nut that must be removed to slide the dogbone off with the long crossmember bolt. The red arrows show the crossmember bolts. 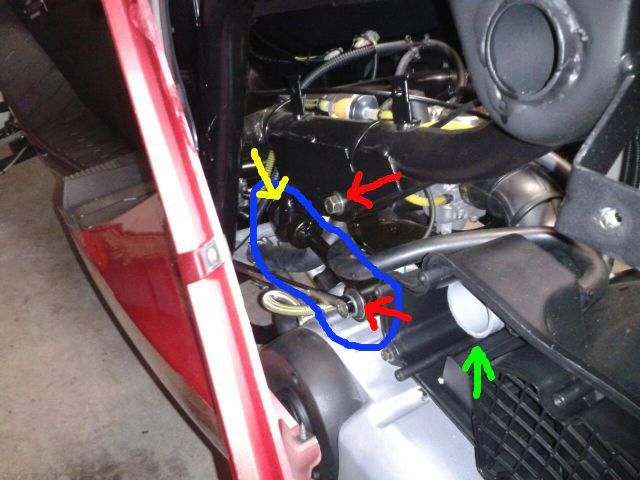 If you're wonderin' what that green arrow is pointing to it's one of the "mods" I had to do during the PDI to get the air tube to stay secured to the air box. Turns out the flared end of a piece of 1 and 1/4 inch PVC conduit fits snugly inside the air box outlet and then provides the support to be able to tighten the crap out of the clamp to keep the air hose secure(otherwise mine kept popping off 'cause the bend of the air tube ain't quite right). 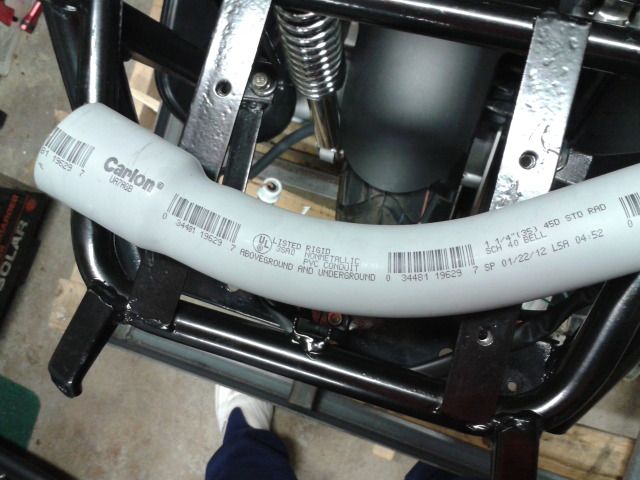 Ok, now you want to c-a-r-e-f-u-l-l-y separate the side body panel from the rear panel. This panel must be separated to allow for room to remove the long bolt from the crossmember. You need to remove the screws from under the rearmost foot pad and a couple from underneath in the rear so you'll be able to flex the panel a little.  The side panel is secured to the back panel with tabs that lock into slots in the rear panel. You need to flex the panel and release these tabs but go easy and be careful, you don't want to break these tabs. Hard parts' over now so you can remove the four nuts from the crossmember and dogbone now. Now you need to support the motor and lift it up slightly to take the load off of the bolts so they'll slide out. I used my floor jack and a piece of 2x4 under the oil drain to raise her up.  You'll know when she's at the perfect height when the bolts get loose. Then you can just slide 'em out and wiggle the crossmember around to remove it.  And there's your motor mount/crossmember! Mine seems to be ok but I don't like the slop the bolts have in the bushings so I'm trying to see if I can find slightly larger diameter bolts for a snugger fit. Real curious to see if daddue11's crossmember bushings failed or a weld failed. |
|
Senior Clinician
  
Currently Offline
This trike you fly!
Posts: 166  Likes: 0
Joined: Jul 29, 2012 10:18:39 GMT -6
|
regrets
by: new2scootn - Oct 5, 2012 8:27:01 GMT -6
Post by new2scootn on Oct 5, 2012 8:27:01 GMT -6
Daddue11, you won't have to take any panels off, just remove the battery tray under the seat and move to the side and you'll be able to see everything. I'll post tonight how to remove the crossmember.
|
|
Senior Clinician
  
Currently Offline
This trike you fly!
Posts: 166  Likes: 0
Joined: Jul 29, 2012 10:18:39 GMT -6
|
regrets
by: new2scootn - Oct 4, 2012 20:55:35 GMT -6
Post by new2scootn on Oct 4, 2012 20:55:35 GMT -6
Glad you're ok daddue11, I think I'd be shaken and mad as hell too. You made me take a close look at my engine support "crossmember" and I found I had about a 1/4 inch of play in the rear wheel side to side. So you know me, I had to tear her apart and see what's what. It took some doing and I'll post some pics on how I did it tomorrow but I got that stinkin' crossmember out to look at it. It doesn't have bearings in it, its made like a bushing(inner tube surrounded by rubber. Here's a pic of the thing.  Mine doesn't look bad but the bolt that goes through it doesn't fit tightly, it has some slop. I'm curious as to what part actually failed, the bushing the long bolt goes through, one or both of the upper bushings that attach to the frame, or the bushings/bearings that are attached to the motor that the long bolt goes through(the ones in this pic). 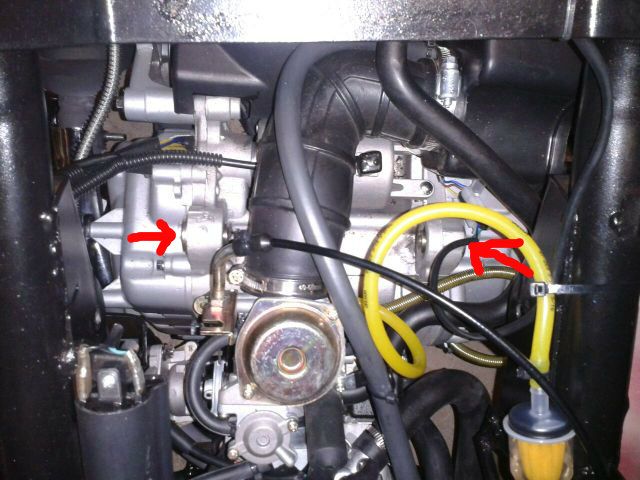 These are probably the most important bushings on this thing 'cause it's only this crossmember and the rear shocks that keep the motor, transmission, and rear wheel attached to the trike. So any info you can give me would be greatly appreciated-thanks. |
|
Senior Clinician
  
Currently Offline
This trike you fly!
Posts: 166  Likes: 0
Joined: Jul 29, 2012 10:18:39 GMT -6
|
regrets
by: new2scootn - Oct 2, 2012 12:07:19 GMT -6
Post by new2scootn on Oct 2, 2012 12:07:19 GMT -6
Wow Daddue11... you're bringin' me down. Sorry to hear about the latest on your trike. I bought mine after doing a lot of research on the web so I've been prepared for most of the trouble I've had so far... That being said, I sure am hopin' this doesn't turn to regret for me too. Good luck gettin' her fixed.
|
|
Senior Clinician
  
Currently Offline
This trike you fly!
Posts: 166  Likes: 0
Joined: Jul 29, 2012 10:18:39 GMT -6
|
Post by new2scootn on Sept 30, 2012 18:21:41 GMT -6
Well I have to thank Justincrediblem for posting his recent issue with loose/worn front suspension bushings/bearings. I got to 300 miles on my trike so I was changin' the oil(like a good boy 'cause they tell ya to on a brightly colored sticker next to the oil cap) and I figured it would be a good time to look her over in general. When I checked the front suspension bushings I couldn't believe it... the uppers on both sides had a ton of play in them! And I'm sure you can tell by my posts that I am MR. anal when it comes to making sure everything is tight. I'm not sure if its because these bushings are rubber covered and maybe the rubber compresses after a while leaving them loose but it took a good many turns on the nuts to tighten them up. I am sure you checked All of your bushings Justin but daddue11 and anyone else out there with a Sunny reverse trike should go out there right now and check 'em all before any looseness becomes wear or damage. If you can spin any of the bushings by hand like I could it means they're really loose. But don't just tighten the ones you can turn, make sure they're ALL tight. Maybe we can make vibration a thing of the past in this trike! Good ridin' to all...
|
|
Senior Clinician
  
Currently Offline
This trike you fly!
Posts: 166  Likes: 0
Joined: Jul 29, 2012 10:18:39 GMT -6
|
Post by new2scootn on Sept 29, 2012 22:11:09 GMT -6
Thanks Alleyoop
|
|
Senior Clinician
  
Currently Offline
This trike you fly!
Posts: 166  Likes: 0
Joined: Jul 29, 2012 10:18:39 GMT -6
|
Post by new2scootn on Sept 29, 2012 20:28:29 GMT -6
Anybody familiar with these variators/using one/or have an opinion about them? I've got a Sunny Roadrunner 300 trike(MC_D300TKB) with the yamaha clone engine so I think this would be the choice( www.scootertronics.com/variator.html ). My trike is new so I'm in no hurry to spend a bunch of money on upgrades yet...just kinda window shoppin' and wonderin' what others think of this thing. |
|
Senior Clinician
  
Currently Offline
This trike you fly!
Posts: 166  Likes: 0
Joined: Jul 29, 2012 10:18:39 GMT -6
|
Post by new2scootn on Sept 28, 2012 8:39:54 GMT -6
Thanks everyone!  ;D  |
|
Senior Clinician
  
Currently Offline
This trike you fly!
Posts: 166  Likes: 0
Joined: Jul 29, 2012 10:18:39 GMT -6
|
Post by new2scootn on Sept 27, 2012 22:29:02 GMT -6
Thanks for the advice Alleyoop and jct842. I took your suggestions and came up with a fix that has really worked well. I liked the idea of the fuel line connecting at the lowest point of the tank but wasn't willing to go through the hassle of removing it, prepping it, and having a fitting welded to it. Sooo... if you recall I mentioned previously that there was a drain on the bottom of the tank. Turns out it's in the perfect location for the fuel line. Metric threads though and I couldn't find a fitting that would just thread in so I had to improvise. Found a concrete strike anchor at the hardware store that has proven to be the ticket.  It's got 5/16 inch threads which are real close to the metric threads of the drain plug. I pulled the nail out and you're left with a hollow tube threaded on one end. I cut the excess length of the non threaded end off and ground a groove into the middle to better grab the fuel line. The hole through it was kinda small so I drilled it out to 11/64 inch. Bought a 5/16 tap to match the threads, tapped the drain nut on the bottom of the tank and my makeshift fitting screwed right in. And just by luck the threaded end is the perfect length so when it's screwed in all the way it sticks up from the bottom of the tank about a half inch so it won't be sucking up any garbage laying on the bottom. I used thread sealer on the threads that I had purchased for some natural gas line and propane fittings a while back and absolutely no leaks! 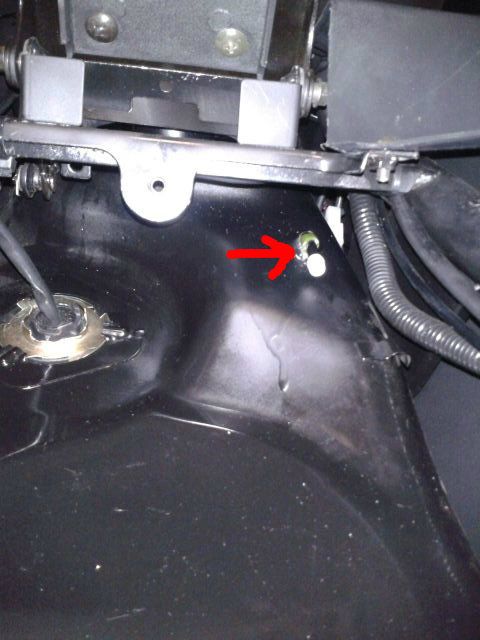 This pic shows the top of the tank with the arrow pointing to the old fuel line nipple which now has a white plug sealing it.  Here's the view from above showing the much neater fuel line routing--no more line laying on top of the tank. 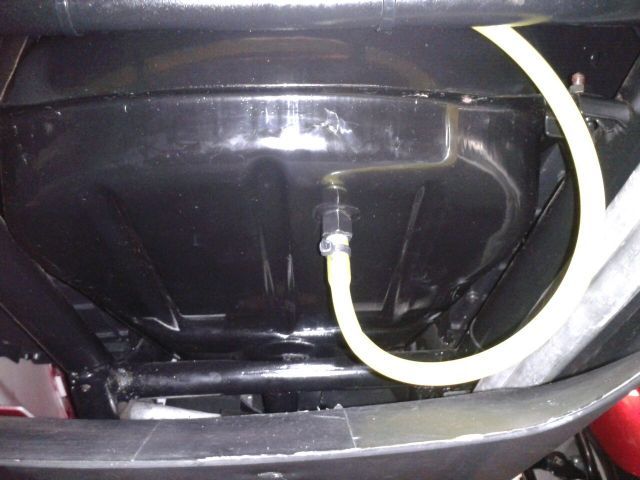 And here's what she looks like from underneath with the new fitting. 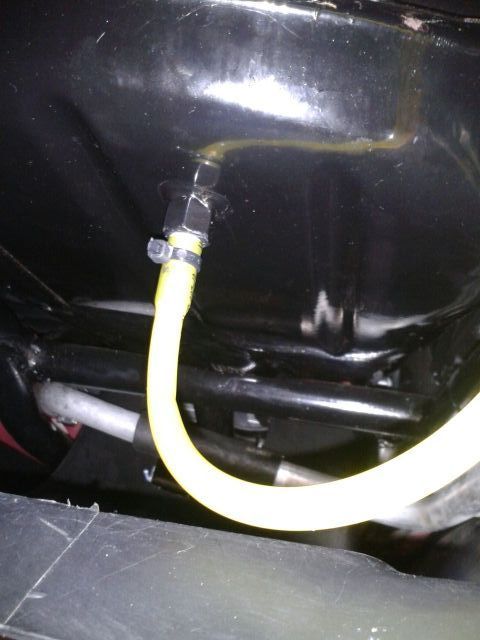 And just a close up of the fitting. The more I got to thinking about whether or not to fix this tank the more I figured so what if the new tank is no better(or worse) than this one? So thanks again guys for the suggestions that kinda pushed me into this fix. Oh yeah, almost forgot. This totally fixed my loss of power/bogging down issue on prolonged full throttle. She's runnin' like a raped ape even up hill full throttle. Had her up to 77 mph tonight(ok it was a slight downgrade) but now I'm wonderin' if she might catch 80(no I'm not plannin' on ridin' her over a cliff). Now if I can just get this pesky fuel gauge to work she'll be close to perfect. |
|
Senior Clinician
  
Currently Offline
This trike you fly!
Posts: 166  Likes: 0
Joined: Jul 29, 2012 10:18:39 GMT -6
|
Post by new2scootn on Sept 27, 2012 12:23:14 GMT -6
Thanks for ruining my lunch...  |
|
Senior Clinician
  
Currently Offline
This trike you fly!
Posts: 166  Likes: 0
Joined: Jul 29, 2012 10:18:39 GMT -6
|
Post by new2scootn on Sept 23, 2012 23:29:43 GMT -6
So my trike's been either stalling out or drastically losing power on prolonged near full throttle and it's been buggin' the hell out of me. I have known it's a fuel issue and figured it was one of three things: an improperly adjusted float in the carburetor, a vacuum fuel pump that wasn't quite up to the task, or a bad fuel pick-up inside the fuel tank. With a completely full tank it seemed to be symptom free and things got progressively worse as the tank emptied. So the pick-up in the tank seemed like the most likely culprit. I borrowed a video scope and looked inside the fuel tank. I found that there's a copper tube inside the tank that goes from the outlet nipple, down along the seam to the back of the tank, then turns in and down and ends mid-tank about a half inch above the bottom. No filter or pick-up per se just an open ended copper tube-but nothing wrong with that. I followed along this tube and found a spot where it's soldered to what appears to be another tube attached to the side of the tank. This is to secure the tube in the rear of the tank. It was hard to get the right angle for a clear view but it looked like there was a pinhole in the tube at this point. And this was just above the seam of the tank so it made sense that when the tank was full this pinhole would be submerged under gas and as it got to below half a tank it would start to suck air. So how to test this theory... After a lot of thought I figured the easiest thing to try would be to disconnect the fuel line from the fuel pump and blow air into it and suck gas back out(trying not to get a mouthfull in the process-yuck!) while watching with the scope. This proved to be easier said than done but after a few small tastes of gas I got the proper method down and scope positioned. By the way, I had just enough fuel in the tank to have the end of the pick-up tube in about an inch of gas(about a gallon in the tank). So the point where I thought there was a pinhole was above the gas and I was hoping to see some gas seep or spurt out of the hole in between gags. Well I got nothing conclusive but it seemed like some gas was trickling down from above when I was blowing air into the tank. So I followed the tube back up towards the front of the tank and could see more and more fuel splashes. Finally made it back to where the copper tube is soldered on the inside of the tank to the nipple where the fuel line attaches on the outside of the tank. And thats where my problem is... when I would suck a little fuel into the fuel line then blow it back in, it would spray out all around this soldered area. Which means it's suckin' air from inside the tank when the fuel level is below absolute full. So I need a new fuel tank-will be callin' Carl from Hotrodpocketbikes tomorrow to start the process. Next will be trying to trace the loose connection(?) to my fuel gauge--keeps readin' empty(sheesh, if it aint' one thing it's another!) Good thing I don't mind tinkerin'-not sure how crazy the wife is about it though...
|
|
Senior Clinician
  
Currently Offline
This trike you fly!
Posts: 166  Likes: 0
Joined: Jul 29, 2012 10:18:39 GMT -6
|
Post by new2scootn on Sept 23, 2012 21:13:08 GMT -6
Wow Justin, that bushing/bearing really is bad! Can't really tell from pics and video if the bearing is actually bad though, or if the bolt is just loose. When I put mine together I lubricated the bushings with lithium grease and tightened them hard enough to bring the brackets in tight. Are your brackets in tight against the bushings? Are the bolts tight enough?
Daddue11, glad to hear you're getting your vibes ironed out. Justin and I have 2012 models which come with speedometers that register in mph-if you wanted to change yours out I'm sure Sunny would be happy to sell you one! My vibration issues are all but gone if I could just keep her runnin' at near full throttle. But that's a subject for another thread...
|
|
Senior Clinician
  
Currently Offline
This trike you fly!
Posts: 166  Likes: 0
Joined: Jul 29, 2012 10:18:39 GMT -6
|
Post by new2scootn on Sept 22, 2012 13:26:33 GMT -6
Can you take a picture of the bushing you're talking about? I'm glad you found that the one tire was rolling in the wrong direction. I actually noticed it from looking at your pictures the other day but my lazy butt never made it back to let you know. I've got almost all major vibration licked on mine now. Balanced the front wheels and installed the PROPER amount of Ride On in the front tires and now when slight vibration starts up at about 62 mph if I maintain that speed it goes away in about a 1/4 mile(as the Ride On does it's magic) and then is smooth up to 74. My biggest problem now is sudden loss of power(running out of fuel) on prolonged hard acceleration. I know it's not losing spark and I suspect that the vacuum fuel pump just can't keep up at near full throttle. If you or anyone else have any ideas I am all ears. I am borrowing a video scope from a co-worker and will be looking inside the fuel tank this weekend. I'll let you know what I find.
|
|
Senior Clinician
  
Currently Offline
This trike you fly!
Posts: 166  Likes: 0
Joined: Jul 29, 2012 10:18:39 GMT -6
|
Post by new2scootn on Sept 18, 2012 23:30:03 GMT -6
Here's pics of fuel tank and lines Alleyoop.  The blue arrow shows the fuel filler neck at the top of the tank. The red arrow shows where the fuel line attaches to the tank(hidden behind a bracket in this pic). The yelllow arrow shows the fuel line following along the fuel tank around to the other side to the fuel pump.  Here the arrow shows the vacuum fuel pump with the fuel line entering in the front, exiting in the rear, and going on to the carburetor. 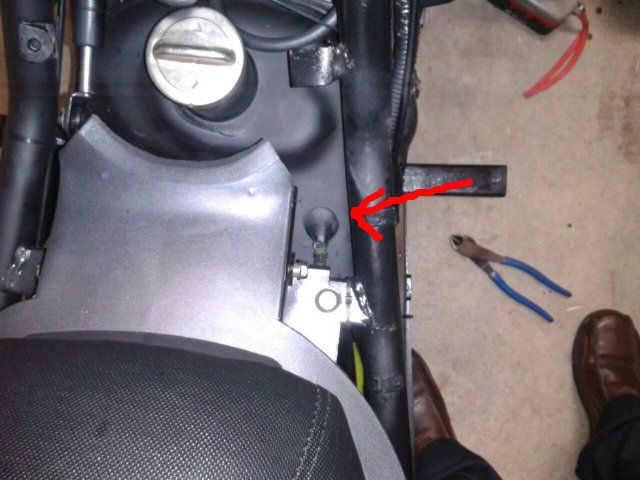 And finally this one shows a view looking straight down from above the fuel filler neck-the arrow shows the nipple where the fuel line attaches(also shows where I had to put the epoxy to fix the pinhole fuel leak in that nipple). |
|

