Doc's Anything Goes
Currently Offline
Posts: 270  Likes: 32
Joined: Nov 10, 2014 10:58:09 GMT -6
|
Post by dmartin95 on May 15, 2015 9:26:25 GMT -6
Stock wire gauge is ridiculously small.... I have found 22 gauge on my stator circuit (main charging wires to R/R)
I have found that AWG 18 is good for everything except:
your starter and battery hots... Your frame and engine ground should get 14~12 AWG...
16 AWG is usable and will actually be better, but, it's harder to work with, won't fit stock plugs and more costly.
|
|
Doc's Anything Goes
Currently Offline
Posts: 270  Likes: 32
Joined: Nov 10, 2014 10:58:09 GMT -6
|
Post by dmartin95 on May 15, 2015 8:04:27 GMT -6
Can you explain the wiring of the bulb. There is a wire that goes directly to the side of the base (green on the connector) I assume that's the bulb ground. Then the green/yellow and brown go to the two posts on the bottom of the bulb. I have the wiring diagram for my Bintelli Havoc. I think the wiring for the lights are the same. Bintelli has an online chat feature on their home page... You can always go to bintelliscooters.com/ and ask them for a wiring diagram... That's how I got mine... (The diagram didn't come colored, I colored it myself) 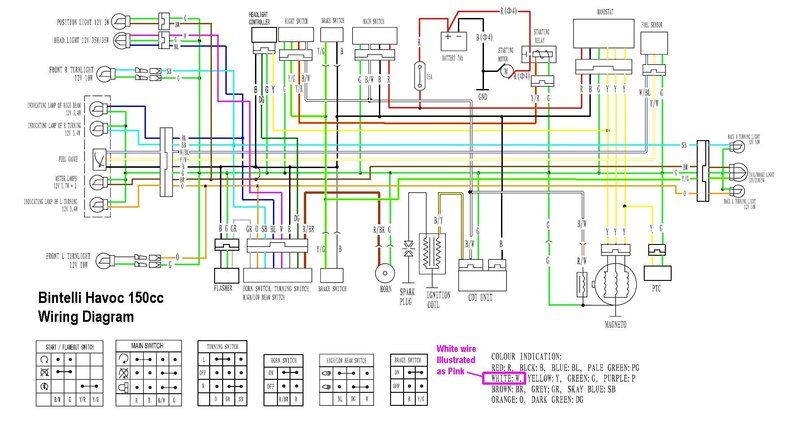 |
|
Doc's Anything Goes
Currently Offline
Posts: 270  Likes: 32
Joined: Nov 10, 2014 10:58:09 GMT -6
|
Post by dmartin95 on May 14, 2015 22:38:00 GMT -6
REMEMBER YOU ARE LOOKING FOR THE HIGHEST IDLE OUT OF THAT SCREW. Alleyoop I think I discovered the problem..... It's not in my Jet or adjustment screws... It was a combo of things... I didn't have any clamps on my going from my accelerator pump t the intake causing a big leak in vacuum.... In addition, I've removed the original vacuum petcock and fuel filter and replaced with a manual petcock and a filter for riding lawn mower... In addition, my fuel run for about 6", was at about 1° + on the bubble.. I thought it was level... In short, even it's not the fix, I have blue poly lines and can see I'm having fuel delivery issues.. Tomorrow I'm gonna do a whole new fuel line setup. |
|
Doc's Anything Goes
Currently Offline
Posts: 270  Likes: 32
Joined: Nov 10, 2014 10:58:09 GMT -6
|
Post by dmartin95 on May 14, 2015 22:28:49 GMT -6
That exhaust was bouncing high pressure waves all over the place,,, I'm surprised it ran as good as it did,,,when you get a decent pipe on that thing it's going to be very powerful,,,and very smooth throughout the rev range when it's tuned and fully sorted out I put the stock pipe back on and it made a world of difference.... This puppy will peel out without me having to hold the breaks... It can get squirly on take off on you if you're not careful..... I know right now I'm going to have to change the gears.... While I did put a BBK on here, I only went up 5cc's... This 4 valve is what is going to make all the difference... This thing is gonna be nuts I'm thinking.... |
|
Doc's Anything Goes
Currently Offline
Posts: 270  Likes: 32
Joined: Nov 10, 2014 10:58:09 GMT -6
|
Post by dmartin95 on May 14, 2015 22:25:31 GMT -6
You're doing a great job so far. By the time Alley gets done pounding on your brain, you will know what you're doing on carbs as well. Thank g-man! The compliments are appreciated.. I worked hard on this motor...I nice to hear the words "good job". Ran into a few problems, but all in all, she doesn't smoke and compression is great! Getting the fuel worked out is just about wrapped up... Or at least I'm getting closer.... |
|
Doc's Anything Goes
Currently Offline
Posts: 270  Likes: 32
Joined: Nov 10, 2014 10:58:09 GMT -6
|
Post by dmartin95 on May 13, 2015 15:14:32 GMT -6
Can you expand on what you mean by "looking for the highest idle"? I totally follow ya on adjusting A/F screw to richen it up.... But I'm having a hard time separating RPM's with Idle in the context of your post... When you increase the idle, RPM goes up.... With the current setup I have now if adjust higher my RPM's increase and i'm already at 1800 rpm when at idle... Stock RPM idle was 1700 So can you expand on what you're saying because I'm pretty sure I'm not understanding exactly what you're saying... HIGHEST IDLE is equal to HIGHEST RPMS(AT IDLE) adjusting the Fuel Ratio Mixture Screw. THEN once you get the highest rpms(idle) from the FUEL RATIO MIXTURE you can then LOWER THE IDLE TO wherever you want "BUT USING THE IDLE SPEED SCREW" on the carb WHICH is different than the Fuel Ratio Screw. On all your carbs you have BASICALLY TWO adjustments FUEL RATIO or AIR RATIO(depending on the carb type) AND a IDLE SPEED SCREW. On a CV or CVK carb you have a Butterfly by the intake side, the idle speed screw is on the Throttle control wheel and has a spring under it , turning it clockwise opens the butterfly(higher idle(rpms)) counter clockwise closes the butterfly(lower idle(rpms). On a Slider type carb(throttle cable going into the top of the carb) the idle speed screw is in the center of the Carb as you look at it. Turning it clockwise raises the Slide(higher idle(rpms) counter clockwise lowers the Slide(lower idle(rpms). Alleyoop Alright, so I went out in the shop and switched the exhaust over to the original... I do not have a performance muffler on hand for this scooter so I had to use it.... Anyhow, as you might expect, this changed all the variables... Now that you've identified that "hollow bog" sound, I can distinguish it better... In prior post called it a "throaty sound",... I thought it was just the acoustics of my duct....But there is a hesitation there also... Now that I've switched the exhaust, the "hollow bog" sound is more prevalent and in addition, I can smell that it's running lean.... I played with the A/F screw (I know the dif between A/F and idle screw) and I was able to keep turning it out without the engine stalling... I for sure am going to have to go up to next jet don't ya think? I can't get a video right now because I'm already uploading the actual build of this engine to youtube.... Stick with me though on this ... Fine tuning a carburetor is my weakest area of expertise when talking about these GY6's. |
|
Doc's Anything Goes
Currently Offline
Posts: 270  Likes: 32
Joined: Nov 10, 2014 10:58:09 GMT -6
|
Post by dmartin95 on May 13, 2015 13:55:05 GMT -6
What threw me was the pipe that looks like a 2stroke expansion chamber,,,all in all not a bad build ,,,a little more tuning and it's going to be great!!!! Good catch! The seller's ad was misleading... After doing a little research, I too think this is a 2 stroke exhaust... I have a few, stock 4 stroke exhaust laying around... I'll get one put on before I start it again.... Thanks brother!  |
|
Doc's Anything Goes
Currently Offline
Posts: 270  Likes: 32
Joined: Nov 10, 2014 10:58:09 GMT -6
|
Post by dmartin95 on May 13, 2015 13:52:17 GMT -6
First try just Turning the Fuel Ratio Mixture Screw on the carb COUNTER CLOCKWISE to richen it up and see if you can get enough fuel to satisfy the amount of air coming in. When turning the Fuel Ratio Mixture you are looking for the HIGHEST IDLE with every 1/4 turns. Also wait for about 10 seconds after the 1/4 to allow the motor to catch up with the new setting. As far as the MAIN JET wait until you get the bog out from the low end, then you can work on the top end part.
REMEMBER YOU ARE LOOKING FOR THE HIGHEST IDLE OUT OF THAT SCREW. Alleyoop Can you expand on what you mean by "looking for the highest idle"? I totally follow ya on adjusting A/F screw to richen it up.... But I'm having a hard time separating RPM's with Idle in the context of your post... When you increase the idle, RPM goes up.... With the current setup I have now if adjust higher my RPM's increase and i'm already at 1800 rpm when at idle... Stock RPM idle was 1700 So can you expand on what you're saying because I'm pretty sure I'm not understanding exactly what you're saying... |
|
Doc's Anything Goes
Currently Offline
Posts: 270  Likes: 32
Joined: Nov 10, 2014 10:58:09 GMT -6
|
Post by dmartin95 on May 13, 2015 13:45:46 GMT -6
The scooter was given to me in pieces from a friend. The motor is the scrappy dog gy6 200 B. Oh yeah! Now I remember.... How's yours coming along? |
|
Doc's Anything Goes
Currently Offline
Posts: 270  Likes: 32
Joined: Nov 10, 2014 10:58:09 GMT -6
|
Post by dmartin95 on May 13, 2015 11:10:48 GMT -6
Oh no doubt for sure. I'm still pecking away at my gy6 200 it sucks when you are getting progress and then hit a stopping point bc of misc parts needed here and there. I don't remember, Is your 200cc one that came stock with your scoot or are you building it? |
|
Doc's Anything Goes
Currently Offline
Posts: 270  Likes: 32
Joined: Nov 10, 2014 10:58:09 GMT -6
|
Post by dmartin95 on May 13, 2015 11:04:05 GMT -6
Im still patiently waiting to see you bust out that gy6 200 B case and see what you do with it. dmartin95 That will be coming up real soon... That will also have a 4 valve head... It will also be liquid cooled...232cc (76mm & +8.8mm stroker), Dr pulley, Ecotrons EFI and just about every other performance upgrade one can think of... I'm gonna race that one. I can repair anything on a GY6, but this is the first time I actually split the case and built one from the ground up... Now that I have some experience with these GY6's you're going to start seeing the builds turn out faster. It boosted my confidence when she fired up... It's a really good feeling when you build a motor yourself and it actually fires up....  |
|
Doc's Anything Goes
Currently Offline
Posts: 270  Likes: 32
Joined: Nov 10, 2014 10:58:09 GMT -6
|
Post by dmartin95 on May 13, 2015 10:44:40 GMT -6
What threw me was the pipe that looks like a 2stroke expansion chamber,,,all in all not a bad build ,,,a little more tuning and it's going to be great!!!! Are you talking about the part on the end of exhaust? The red part? It is an expansion chamber. It comes off in the event I want to open it up for more air... It was sold as a performance exhaust and the ad said you remove the chamber when you're going to race... I only selected it because it matched the colors of the scoot....  For a first time build, it was a challenge. When you're building something like this, You can't just log onto a web forum and ask questions... Like who would've known that I would need to acquire longer studs? Or split the case and install a new chain, what's the length, etc etc... I was in over my head but managed to pull it off...Even though she still needs a little fine tuning, I was quite proud of myself when I heard her fire up for the first time. |
|
Doc's Anything Goes
Currently Offline
Posts: 270  Likes: 32
Joined: Nov 10, 2014 10:58:09 GMT -6
|
Post by dmartin95 on May 13, 2015 10:36:28 GMT -6
Martin , it is not running as good as it should it is bogging on you when you open the throttle that is the HOLLOW SOUND BOG you hear. It needs a little more fuel, you can try Richen the Fuel Ratio on the carb. It should rev up nice and quick without hesitation and or bogging and come down quick to idle. Alleyoop I can try a 110.... Right now it has a 108 and 35.... Anything larger than the #35 she spits fuel out the exhaust... A #114 main and she was smoking out the exhaust... My sweetspot has to be in between the 108 and 114. What do you suggest? I should get another video with the stock air filter. It's sounds completely different. Then again, I suppose it would because it would be taking in way less air.... I thought that "hollow bogg" sound was from the acoustics of my air duct.... I have an O2 sensor... I need to get out to a muffler shop and have my bungs welded on... Once I get the O2 sensor I can eliminate the guess work... |
|
Doc's Anything Goes
Currently Offline
Posts: 270  Likes: 32
Joined: Nov 10, 2014 10:58:09 GMT -6
|
Post by dmartin95 on May 12, 2015 17:44:38 GMT -6
The other night I finished my first 4 valve conversion. I recorded the whole process but am not done with editing yet. I will add the videos in the coming days... The kit I purchased was a Taiwan kit, but not the Taida kit. I also own the Taida 4 valve which is a higher quality and comes with all the right stuff, unlike this kit... For those who clicked the link you will see it comes with 4, 213mm cylinder stud screws, but only 2 are the right size. You will also need 2, 218mm studs. I acquired them from a Taida 218/225 kit. In addition, you will need to increase the chain to a 46 (aka 92) link chain. The other upgrades Consisted of a 58.5mm BBK bringing it up to a 155cc, installed an 11 pole stator, Hoca Premium Gasket set and this Taiwan CVT set. I fired her up and after finding the right Jet setup (#35 and #108 in Keihin PD24J) she runs smooth as butter and in my first test runs I hit 58MPH and was only at 6000RPM's with plenty left to go... I can't really get into her until shes gets broke in. The components were around $300 with another $25.00 in gaskets and various other materials. It's one of an upgrade without having to cut the case.... Here's some pics: 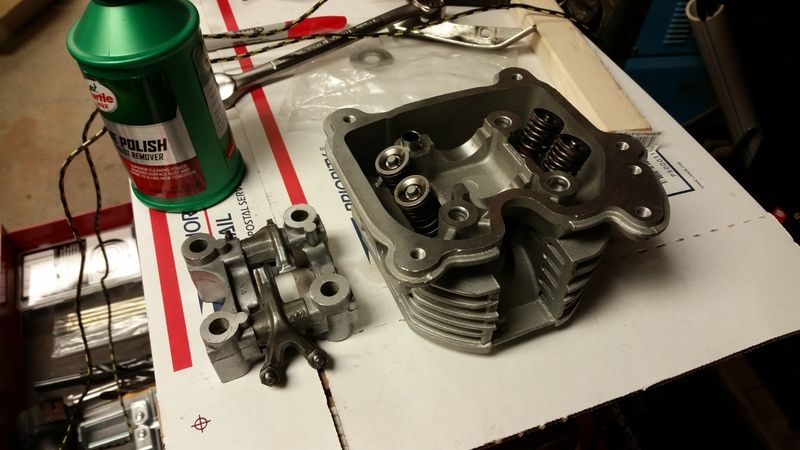 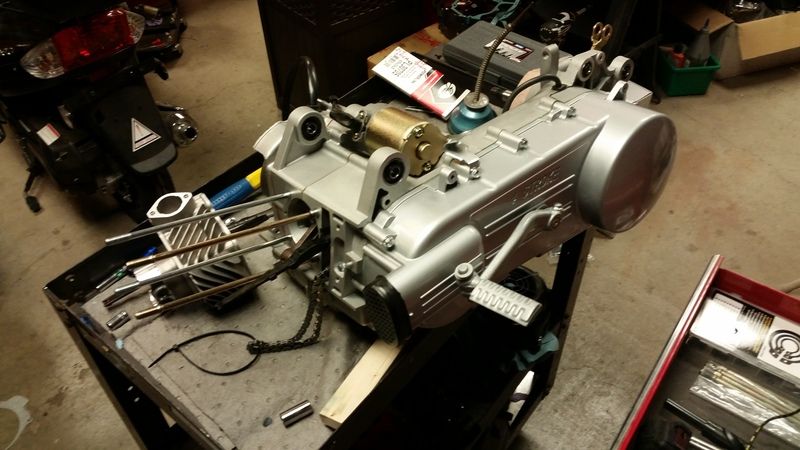 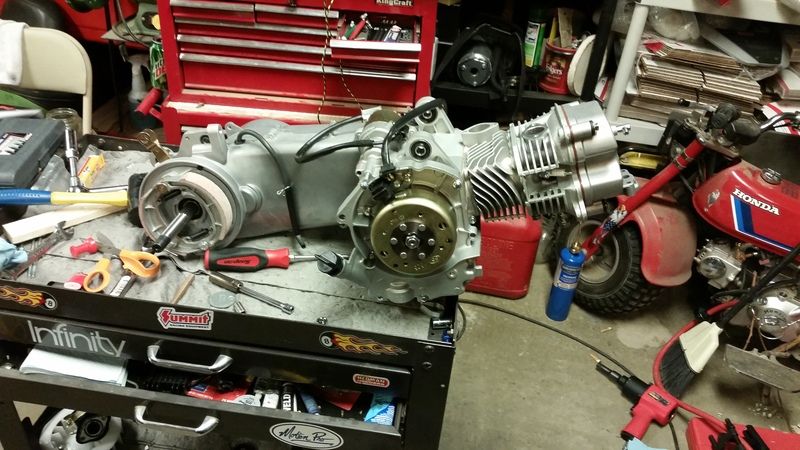 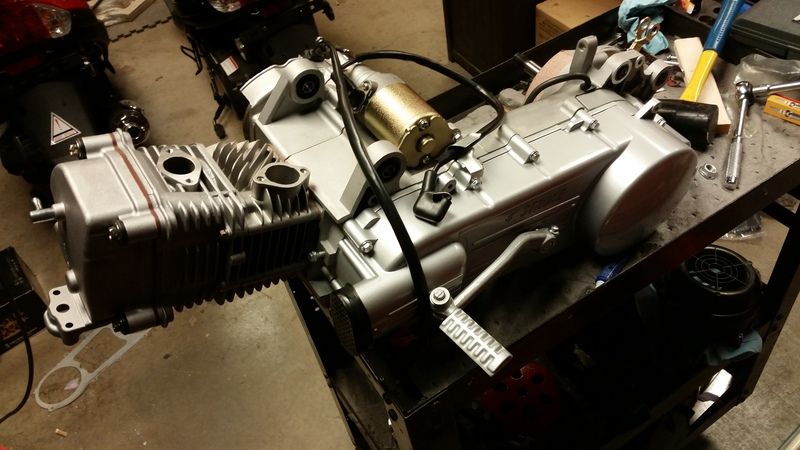 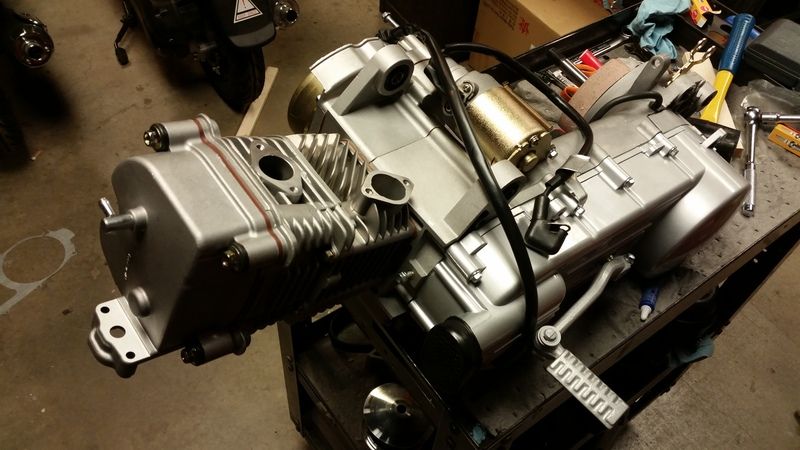 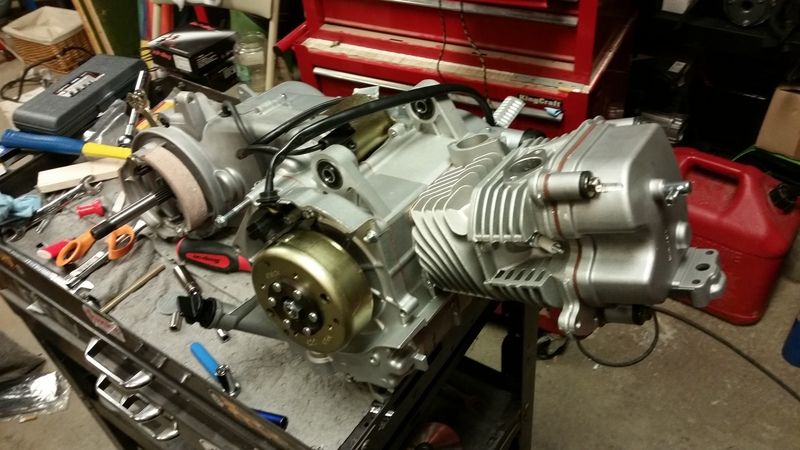  And here's a video of me starting her up: |
|
Doc's Anything Goes
Currently Offline
Posts: 270  Likes: 32
Joined: Nov 10, 2014 10:58:09 GMT -6
|
Post by dmartin95 on May 11, 2015 17:43:28 GMT -6
The size of the oil drain plug is M12 x 1.5
|
|

