Senior Clinician
  
Currently Offline
2008 Zhenjiang Summit Hauw HY150T-5
Posts: 144
Likes: 0
Joined: Aug 31, 2011 12:02:04 GMT -6
|
Post by silverfox96 on Oct 12, 2011 8:58:32 GMT -6
Hello everyone. As you aware, I'm 71 years old and getting down on the concrete floor of my garage to do maintianence on my 2 scooters is difficult, to say the least! I've decided to build a work table to run the scoots up on for maintainence and repair. It will be 30" wide, 20 3/4 " tall and 8' long, with an 8' removable ramp. If anyone is interested, I can take some photos of the progress and post them on the forum. I've already cut the legs to length, ripped the 3/4" ply to the desired width and cut the cross braces. Found a plan on a forum, don't remember which one and have made it mine, with some changes.
No more bruised knees or aching back from kneeling and lying on the concrete floor for me!
|
|
|
|
Post by Bashan on Oct 12, 2011 9:44:07 GMT -6
I would LOVE to see your progress in pictures! I'm getting to the point I'm going to have do something to make the scooters more accessible to work on. If your table works out I'll make a clone of it.  Rich Rich
|
|
Senior Clinician
  
Currently Offline
2008 Zhenjiang Summit Hauw HY150T-5
Posts: 144
Likes: 0
Joined: Aug 31, 2011 12:02:04 GMT -6
|
Post by silverfox96 on Oct 12, 2011 10:23:21 GMT -6
Will do, then!
|
|
Senior Clinician
  
Currently Offline
Posts: 107
Likes: 0
Joined: Jan 3, 2011 10:10:57 GMT -6
|
Post by Hammerspur on Oct 12, 2011 10:37:10 GMT -6
Here's my POS... the table I mean!  |
|
|
|
Post by Bashan on Oct 12, 2011 11:10:01 GMT -6
So the combination of steroids and meth you inject into your brainstem is what makes it possible for you to lift the scooter onto that.....er....table?  Rich Rich
|
|
Doc's Anything Goes
Currently Offline
 Say no to scooter abuse
Posts: 3,873
Likes: 156
Joined: Mar 31, 2010 19:07:16 GMT -6
|
Post by jct842 on Oct 12, 2011 13:35:47 GMT -6
and this comes at the time where I am about to start tractor and haul some cement blocks to my shop/garage to do the very same thing. and get into making the caliper mounting bracket modified to fit my scooter. what I really want to do is make some thing that folds and can be stored out side out of yellow wood. john
|
|
Senior Clinician
  
Currently Offline
Posts: 107
Likes: 0
Joined: Jan 3, 2011 10:10:57 GMT -6
|
Post by Hammerspur on Oct 12, 2011 15:27:57 GMT -6
So the combination of steroids and meth you inject into your brainstem is what makes it possible for you to lift the scooter onto that.....er....table?  Rich Rich Stopped doing that, gives me a headache.  Actually it wasn't all that hard. Laid the plywood on one crate ramp-like, rolled up and deployed the center stand and humped the back end up by the shocks while my wife slid the second crate into the desired position. Sure beats having to bend so far down. |
|
|
|
Post by Alleyoop on Oct 12, 2011 15:42:05 GMT -6
HAHAHA!! now that is funny as crap. Replace the Crates with Folding legs on the Plywood then with one side flolded it will also act as a ramp you can roll the scoot up put it on the centerstand and since the centerstand folds backwards you then can lift it up and unfold the back legs on the platform. ONE MAN JOB and you can fold it up and hang it out of the way.
Alleyoop
|
|
Senior Clinician
  
Currently Offline
2008 Zhenjiang Summit Hauw HY150T-5
Posts: 144
Likes: 0
Joined: Aug 31, 2011 12:02:04 GMT -6
|
Post by silverfox96 on Oct 13, 2011 8:50:33 GMT -6
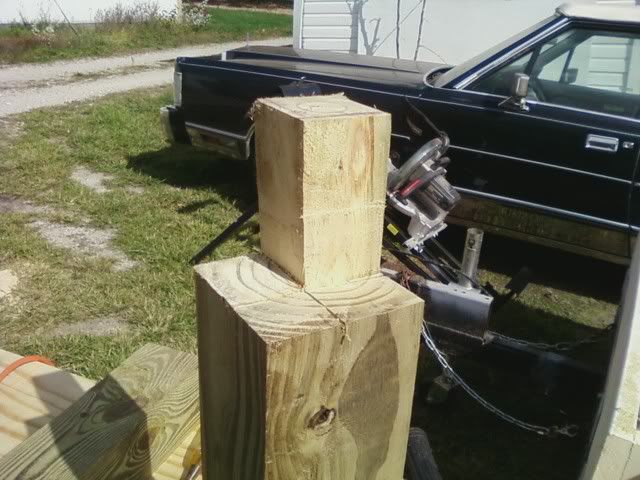
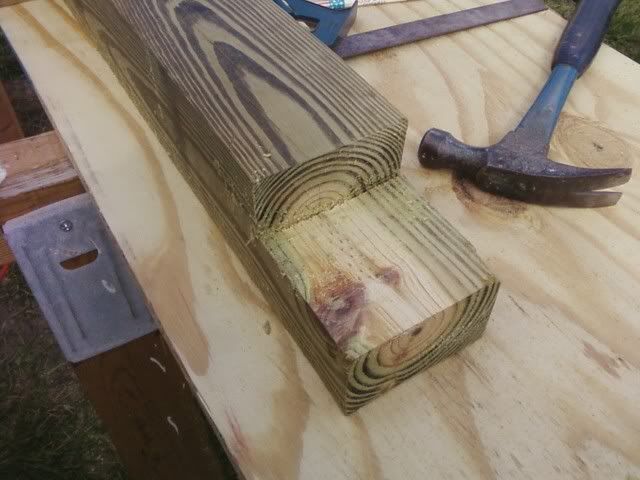
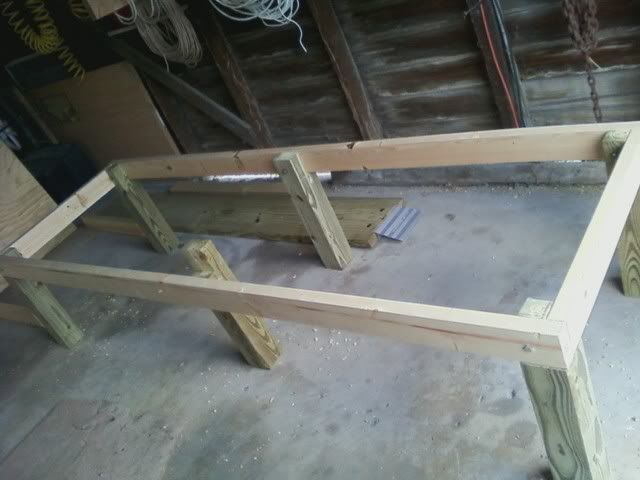
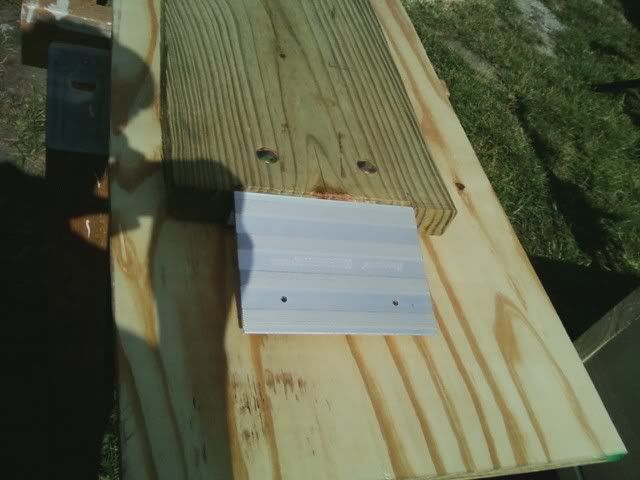
Good morning everyone, from Indiana. Well, for the table! I went to Lowes to get the materials for this build, which consisted of: 1 ea. 4'x8' plywood 3/4" (which turned out to be 21/32") 4 ea. 2"x4"x96" (8') 2 ea. 4"x4"x72" (6') treated posts 1 ea. 2"x12"x96" treated 1 set of aluminum ramp ends. (only available in a pair) 1 bx of 2" drywall screws (1 1/2" would work just as well) I started by loading the 4x8 plywood onto my workhorses and ripped it to a width of 30"x8' with my circular saw. Be sure and mark with a chalk line and take your time adhereing to the line. I then set up my 10" mitersaw and stand. Set the stop to 20" for the 6 legs and cut them out of the 4x4's. This can be done with a circular saw or a hand saw, if you have the stamina for the hand saw. Since I had the miter saw already set up, I reset the stop to 27" and cut 5 pieces from the 2x4's for the spreaders and ends of the frame. I lined up, side by side, the 6 4x4 legs, making sure that they were exactly even on the ends. Measure and mark from the end of the legs 3 1/2 inches scribe a line. It's best if you clamp the six legs together for this. I did not but it turned out just fine for me. Set your circular saw to a depth of 1 1/2 inches and cut the line out. Roll 4 of the legs 1/4 turn, even the ends again and reclamp. These will be for the corners. Mark and scribe to 3 1/2 inches. and with your circular saw still set at 1 1/2" depth cut these lines out. I then stood each leg on end, with the cuts at the top. In parallel with the previous cuts on the sides mark the ends 1 1/2" in. Secure the leg by clamping to a sturdy verticle (I used the side of my trailer for this). Adjust your saw depth to maximum or 3 1/2 inches and make the cuts on the lines. With either a hand saw or a saws-all, finish each cut to the proper depth and clean up with a sharp chisel. The result should look something like this.  The two remaining 4x4 legs will need only one verticle cut and will look like this one.  Now lay the 2 remaining 2x4x8' on the floor and align the legs at 90 degrees.... one on each end and one in the center of the 2x4. Using a 3/8 drill bit make one hole through each leg and into the 2x4. I used 6 inch x 3/8 bolts that I already had. Fit the bolts through the 2x4 and the legs. flat washer goes on next then the nut and tighten. Stand the sides (rails) up on the legs and install the end pieces, (stiles) with 4" drywall screws. (Just a hint, If you spit on the screws they go in easier) When completed it will look similar to this.  Make certain that the frame is perfectly square at this point by measuring diagonally. Once the frame is square, lay the plywood on it and align the ends and factory cut side with the frame. Using the 2" drywall screws screw the top down to the frame, placing the screws 8" apart. You will more than likely need to pre-drill pilot holes for all the screws. Make sure that you choose a drill bit that is slighty smaller than the diameter of the drywall screws. I then turned the table upside down and installed the remaining 3 stiles with the 4" drywall screws. I decided to utilize some 13" 2x4 braces that I already had cut to a 45 degree angle on the ends, to brace all six legs. One diagonal brace on each of the corner legs and on each side of the center legs to make the platform a bit stronger than the plans that I had. I also added a horizontal brace to the legs on the ends. If you decide to do this, you will need to purchase an additional 2/ 2x4x8' and a box of 4" drywall screws. Once all the stiles and bracing is installed, turn the table upright again. With the table in the upright position, I chalked lines on the top plywood in the center of the stiles. I do this to avoid missing the stile and to give a better look to the geometry of the top. Three screws in each stile is more than sufficient. One in the center (15") and the other two 7.5 inches either side of center. The table is completed. I put a stripe of gorilla tape down the center of the ramp and the table, as you can see from the above picture.  The ramp end does not fit over the 2x12, without trimming about 14 to 3/8 inch from the end of the 2x12. The opposite end of the ramp I cut at a 45 degree angle, to facillitate the mounting of the scooter. I do hope that this concise and understandable to all, since it is the first tutoriol I've written. Have fun and work safely! Btw, I did run my 50 cc up on the table, by myself. It works great! Have yet to try my 150cc on it yet. My step son and I got on the completed table and jumped up and down, repeatedly, in sync. Total weight is right at 365 lbs, and the table didn't squeek or groan in the least! I'm certain that it will hold safely more than 500lbs. I forgot to include this bit of information in this. I started on this project about 1 pm, yesterday and was finished at 7:30pm. This includes an hour off for dinner. But today I'm so stiff and sore you wouldn't believe! LOL Any questions you may have, you can either post here, or pm me. Hopefully someone will be able to use this for their own work table, too. |
|
Senior Clinician
  
Currently Offline
2008 Zhenjiang Summit Hauw HY150T-5
Posts: 144
Likes: 0
Joined: Aug 31, 2011 12:02:04 GMT -6
|
Post by silverfox96 on Oct 13, 2011 9:37:49 GMT -6
Well I don't know what's going on but I posted the directions with pictures of this table. It just doesnt appear. I did locate it but tired of trying to get it to post in the right place. If you can find it I assue you that it is well worth the read.
|
|
|
|
Post by Alleyoop on Oct 13, 2011 10:52:48 GMT -6
Good Job Silverfox96,
That sucker will hold pretty much anything.
Alleyoop
|
|
|
|
Post by royldoc on Oct 13, 2011 11:42:41 GMT -6
Milk crates are a universal building block. I use them all the time. ;D
Roy
|
|
|
|
Post by Alleyoop on Oct 13, 2011 12:45:13 GMT -6
Roy,
That we call the ghetto way ;D
ALleyoop
|
|
|
|
Post by Bashan on Oct 13, 2011 14:09:16 GMT -6
Well I don't know what's going on but I posted the directions with pictures of this table. It just doesnt appear. I did locate it but tired of trying to get it to post in the right place. If you can find it I assue you that it is well worth the read. |
|
Senior Clinician
  
Currently Offline
2008 Zhenjiang Summit Hauw HY150T-5
Posts: 144
Likes: 0
Joined: Aug 31, 2011 12:02:04 GMT -6
|
Post by silverfox96 on Oct 14, 2011 9:24:52 GMT -6
Thanks Rick. I do plan to paint the table with some epoxy paint. Something like the epoxy that one puts on a garage floor, to keep any gasoline and oil from soaking the wood. Before I can use the table I'll have to raise the flourescent light in the center of my garage, too. The 50cc scoot just barely clears it, so I know the 150cc won't. Not only is it a bit taller but also has a windshield. Was just way too stiff and sore yesterday, from the build, to consider messing with that. lol
I've also been scouring craigs list for an lp heating stove for the garage. It just gets too cold during the late fall, thru early spring to spend any time working out there!
|
|

