Senior Clinician
  
Currently Offline
2008 Zhenjiang Summit Hauw HY150T-5
Posts: 144
Likes: 0
Joined: Aug 31, 2011 12:02:04 GMT -6
|
Post by silverfox96 on Oct 21, 2011 8:35:44 GMT -6
I believe that it will be a very long time before any total electric vehicle will be efficient enough for anyone to use for basic transportation. I you only want it for back and forth to the grocery, they might be ok, but the cost is totally prohibitive.
|
|
Senior Clinician
  
Currently Offline
2008 Zhenjiang Summit Hauw HY150T-5
Posts: 144
Likes: 0
Joined: Aug 31, 2011 12:02:04 GMT -6
|
Post by silverfox96 on Oct 19, 2011 9:05:33 GMT -6
Goodness! It seems that the variator is the piece in back and the fanface plate is in front. is that correct?
|
|
Senior Clinician
  
Currently Offline
2008 Zhenjiang Summit Hauw HY150T-5
Posts: 144
Likes: 0
Joined: Aug 31, 2011 12:02:04 GMT -6
|
Post by silverfox96 on Oct 19, 2011 9:02:16 GMT -6
Let me see if I'm understanding what you are saying, Ally. The piece that is behind the finned piece is 115mm and the only thing you are replacing is the finned piece, with perhaps replacement of the rollers. Would replacement of the finned piece to match the size of the piece behind it be enough to get the job done? Then, where did you source the Prodigy variator?
|
|
Senior Clinician
  
Currently Offline
2008 Zhenjiang Summit Hauw HY150T-5
Posts: 144
Likes: 0
Joined: Aug 31, 2011 12:02:04 GMT -6
|
Post by silverfox96 on Oct 19, 2011 8:29:20 GMT -6
I've experienced similar interest in my 150cc. However it's generally not the kids in town. (small town of less than 6000) It's usually older men and women, 55 and up. I guess it's because of my age. I'm 71. I do get lots of compliments from the kids, though.
|
|
Senior Clinician
  
Currently Offline
2008 Zhenjiang Summit Hauw HY150T-5
Posts: 144
Likes: 0
Joined: Aug 31, 2011 12:02:04 GMT -6
|
Post by silverfox96 on Oct 19, 2011 8:25:26 GMT -6
You have convinced me, runningslow. That is the next on the list to acquire, for my 150.
|
|
Senior Clinician
  
Currently Offline
2008 Zhenjiang Summit Hauw HY150T-5
Posts: 144
Likes: 0
Joined: Aug 31, 2011 12:02:04 GMT -6
|
Post by silverfox96 on Oct 17, 2011 11:59:43 GMT -6
I went to the sigma site to look at the manual. It shows set-up for 16" wheel and up, however my scoot has 13" wheels. Too bad, cause I was ready to order one!
|
|
Senior Clinician
  
Currently Offline
2008 Zhenjiang Summit Hauw HY150T-5
Posts: 144
Likes: 0
Joined: Aug 31, 2011 12:02:04 GMT -6
|
Post by silverfox96 on Oct 17, 2011 8:29:59 GMT -6
Thanks trancebear, for the info, although I'm really not into the purchase of a phone. The $200.00 is a definite deterrent, since I'm on a limited income. Unless there is something available for considerably less, I guess I'll just have to put up with the erroneous chin-o-meter.
|
|
Senior Clinician
  
Currently Offline
2008 Zhenjiang Summit Hauw HY150T-5
Posts: 144
Likes: 0
Joined: Aug 31, 2011 12:02:04 GMT -6
|
Post by silverfox96 on Oct 17, 2011 8:03:53 GMT -6
I'm not at all familiar with the operation of any GPS unit, and have some questions for those that use this device for verifying their speed.
1. What make and model gps do you use?
2. What was the cost for it?
3. Does it provide a constant readout of your speed?
4. How difficult is the learning curve for it?
I'm looking for something that will give me accurate readings on my speed at all times. Something that will function as an actual speedometer, to be mounted on the dash and that will act as an additional speedometer.
|
|
Senior Clinician
  
Currently Offline
2008 Zhenjiang Summit Hauw HY150T-5
Posts: 144
Likes: 0
Joined: Aug 31, 2011 12:02:04 GMT -6
|
Post by silverfox96 on Oct 15, 2011 22:03:35 GMT -6
I believe that if I had a trike, I would have built the same type of table Just would have built it wide enough to to accomodate the trike and maybe an additional 8 " on each side. The ramp I would have made from 3 2x12x8', spaced accordingly.
|
|
Senior Clinician
  
Currently Offline
2008 Zhenjiang Summit Hauw HY150T-5
Posts: 144
Likes: 0
Joined: Aug 31, 2011 12:02:04 GMT -6
|
Post by silverfox96 on Oct 15, 2011 9:27:15 GMT -6
Actually, I did consider something like that. HF also has one at 99.99. The main reason I decided against it was the fact that it picked the scooter up from the bottom. Chance of crushing the plastic pan, damaging the CDI and the battery. In addition it would only give you access to one side of the scoot. I even though about buying one and fitting with a platform to run the scoot up on, but I didn't feel that it would be stable enough and with my luck the scoot would fall off! As it turned out it still cost me $81. and change to build the table. Solid as a rock!
|
|
Senior Clinician
  
Currently Offline
2008 Zhenjiang Summit Hauw HY150T-5
Posts: 144
Likes: 0
Joined: Aug 31, 2011 12:02:04 GMT -6
|
Post by silverfox96 on Oct 14, 2011 9:24:52 GMT -6
Thanks Rick. I do plan to paint the table with some epoxy paint. Something like the epoxy that one puts on a garage floor, to keep any gasoline and oil from soaking the wood. Before I can use the table I'll have to raise the flourescent light in the center of my garage, too. The 50cc scoot just barely clears it, so I know the 150cc won't. Not only is it a bit taller but also has a windshield. Was just way too stiff and sore yesterday, from the build, to consider messing with that. lol
I've also been scouring craigs list for an lp heating stove for the garage. It just gets too cold during the late fall, thru early spring to spend any time working out there!
|
|
Senior Clinician
  
Currently Offline
2008 Zhenjiang Summit Hauw HY150T-5
Posts: 144
Likes: 0
Joined: Aug 31, 2011 12:02:04 GMT -6
|
Post by silverfox96 on Oct 13, 2011 10:17:41 GMT -6
Sprocket, Remember the old saying, "you can lead a horse to water, but you can't make it drink!" The horse has been lead, noat your fault it won't drink! lol
|
|
Senior Clinician
  
Currently Offline
2008 Zhenjiang Summit Hauw HY150T-5
Posts: 144
Likes: 0
Joined: Aug 31, 2011 12:02:04 GMT -6
|
Post by silverfox96 on Oct 13, 2011 9:37:49 GMT -6
Well I don't know what's going on but I posted the directions with pictures of this table. It just doesnt appear. I did locate it but tired of trying to get it to post in the right place. If you can find it I assue you that it is well worth the read.
|
|
Senior Clinician
  
Currently Offline
2008 Zhenjiang Summit Hauw HY150T-5
Posts: 144
Likes: 0
Joined: Aug 31, 2011 12:02:04 GMT -6
|
Post by silverfox96 on Oct 13, 2011 8:50:33 GMT -6
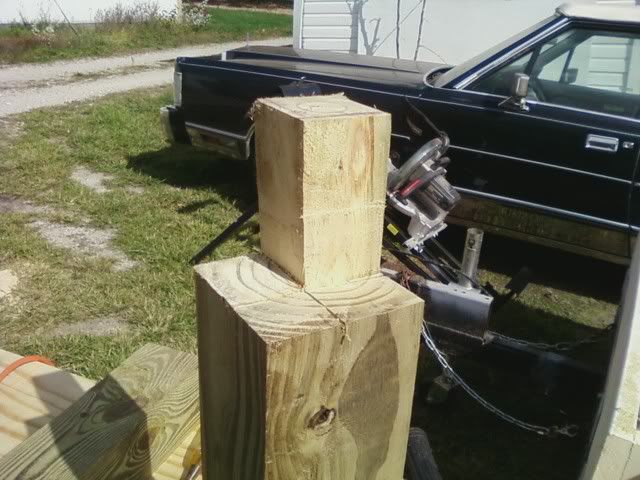
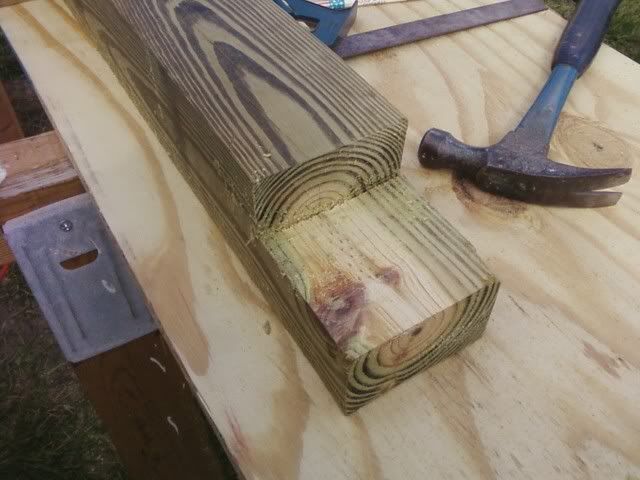
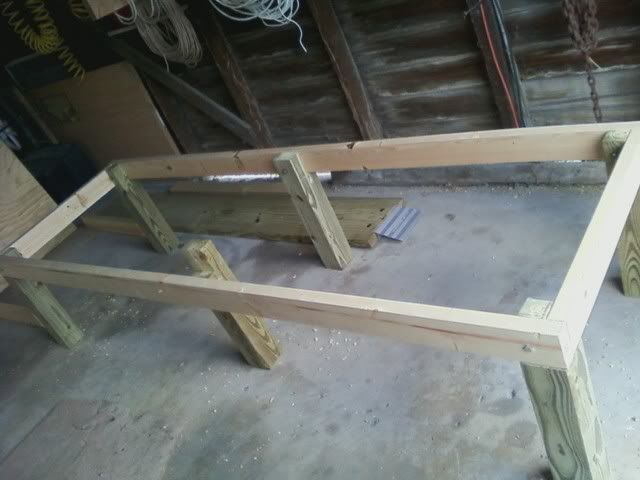
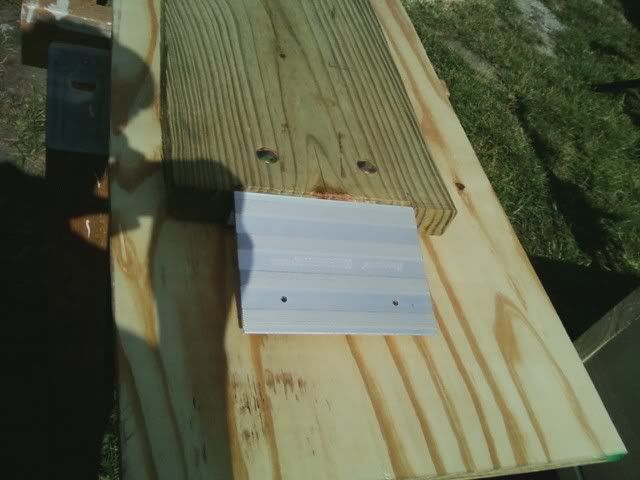
Good morning everyone, from Indiana. Well, for the table! I went to Lowes to get the materials for this build, which consisted of: 1 ea. 4'x8' plywood 3/4" (which turned out to be 21/32") 4 ea. 2"x4"x96" (8') 2 ea. 4"x4"x72" (6') treated posts 1 ea. 2"x12"x96" treated 1 set of aluminum ramp ends. (only available in a pair) 1 bx of 2" drywall screws (1 1/2" would work just as well) I started by loading the 4x8 plywood onto my workhorses and ripped it to a width of 30"x8' with my circular saw. Be sure and mark with a chalk line and take your time adhereing to the line. I then set up my 10" mitersaw and stand. Set the stop to 20" for the 6 legs and cut them out of the 4x4's. This can be done with a circular saw or a hand saw, if you have the stamina for the hand saw. Since I had the miter saw already set up, I reset the stop to 27" and cut 5 pieces from the 2x4's for the spreaders and ends of the frame. I lined up, side by side, the 6 4x4 legs, making sure that they were exactly even on the ends. Measure and mark from the end of the legs 3 1/2 inches scribe a line. It's best if you clamp the six legs together for this. I did not but it turned out just fine for me. Set your circular saw to a depth of 1 1/2 inches and cut the line out. Roll 4 of the legs 1/4 turn, even the ends again and reclamp. These will be for the corners. Mark and scribe to 3 1/2 inches. and with your circular saw still set at 1 1/2" depth cut these lines out. I then stood each leg on end, with the cuts at the top. In parallel with the previous cuts on the sides mark the ends 1 1/2" in. Secure the leg by clamping to a sturdy verticle (I used the side of my trailer for this). Adjust your saw depth to maximum or 3 1/2 inches and make the cuts on the lines. With either a hand saw or a saws-all, finish each cut to the proper depth and clean up with a sharp chisel. The result should look something like this.  The two remaining 4x4 legs will need only one verticle cut and will look like this one.  Now lay the 2 remaining 2x4x8' on the floor and align the legs at 90 degrees.... one on each end and one in the center of the 2x4. Using a 3/8 drill bit make one hole through each leg and into the 2x4. I used 6 inch x 3/8 bolts that I already had. Fit the bolts through the 2x4 and the legs. flat washer goes on next then the nut and tighten. Stand the sides (rails) up on the legs and install the end pieces, (stiles) with 4" drywall screws. (Just a hint, If you spit on the screws they go in easier) When completed it will look similar to this.  Make certain that the frame is perfectly square at this point by measuring diagonally. Once the frame is square, lay the plywood on it and align the ends and factory cut side with the frame. Using the 2" drywall screws screw the top down to the frame, placing the screws 8" apart. You will more than likely need to pre-drill pilot holes for all the screws. Make sure that you choose a drill bit that is slighty smaller than the diameter of the drywall screws. I then turned the table upside down and installed the remaining 3 stiles with the 4" drywall screws. I decided to utilize some 13" 2x4 braces that I already had cut to a 45 degree angle on the ends, to brace all six legs. One diagonal brace on each of the corner legs and on each side of the center legs to make the platform a bit stronger than the plans that I had. I also added a horizontal brace to the legs on the ends. If you decide to do this, you will need to purchase an additional 2/ 2x4x8' and a box of 4" drywall screws. Once all the stiles and bracing is installed, turn the table upright again. With the table in the upright position, I chalked lines on the top plywood in the center of the stiles. I do this to avoid missing the stile and to give a better look to the geometry of the top. Three screws in each stile is more than sufficient. One in the center (15") and the other two 7.5 inches either side of center. The table is completed. I put a stripe of gorilla tape down the center of the ramp and the table, as you can see from the above picture.  The ramp end does not fit over the 2x12, without trimming about 14 to 3/8 inch from the end of the 2x12. The opposite end of the ramp I cut at a 45 degree angle, to facillitate the mounting of the scooter. I do hope that this concise and understandable to all, since it is the first tutoriol I've written. Have fun and work safely! Btw, I did run my 50 cc up on the table, by myself. It works great! Have yet to try my 150cc on it yet. My step son and I got on the completed table and jumped up and down, repeatedly, in sync. Total weight is right at 365 lbs, and the table didn't squeek or groan in the least! I'm certain that it will hold safely more than 500lbs. I forgot to include this bit of information in this. I started on this project about 1 pm, yesterday and was finished at 7:30pm. This includes an hour off for dinner. But today I'm so stiff and sore you wouldn't believe! LOL Any questions you may have, you can either post here, or pm me. Hopefully someone will be able to use this for their own work table, too. |
|
Senior Clinician
  
Currently Offline
2008 Zhenjiang Summit Hauw HY150T-5
Posts: 144
Likes: 0
Joined: Aug 31, 2011 12:02:04 GMT -6
|
Post by silverfox96 on Oct 12, 2011 10:23:21 GMT -6
Will do, then!
|
|

