Certified Clinician
 
Currently Offline
Posts: 67
Likes: 1
Joined: Mar 4, 2013 1:58:10 GMT -6
|
Post by vansmack2 on Jul 22, 2013 14:23:26 GMT -6
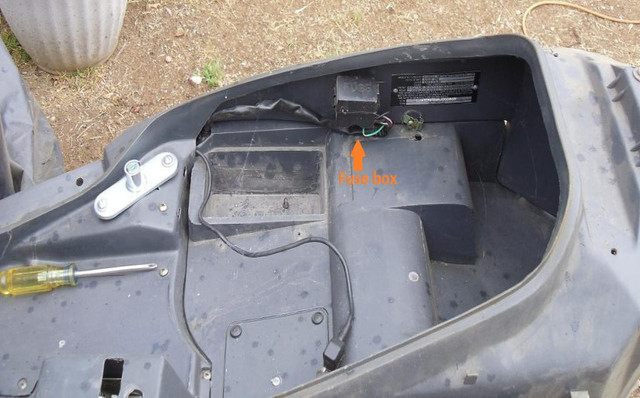
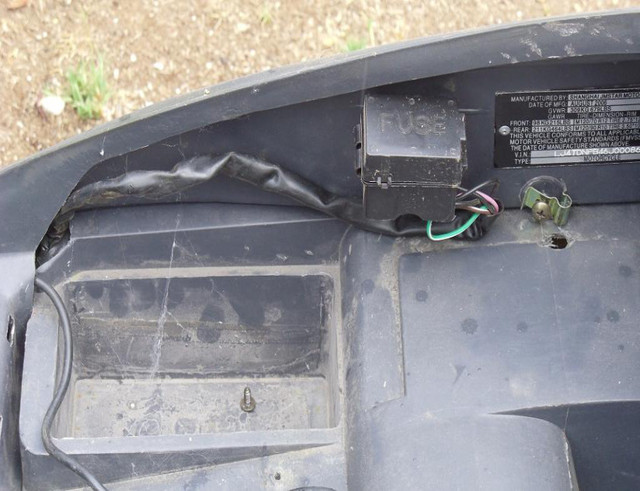
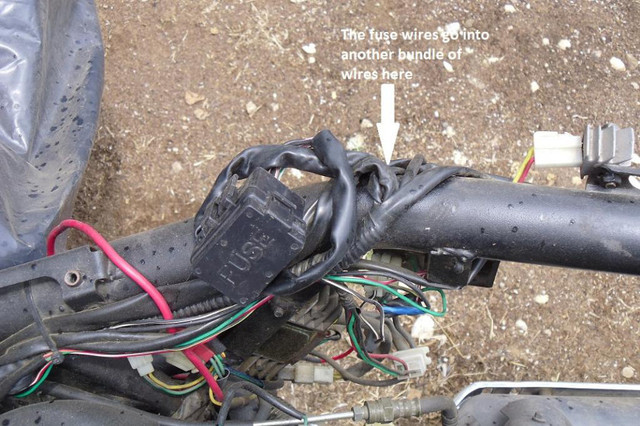
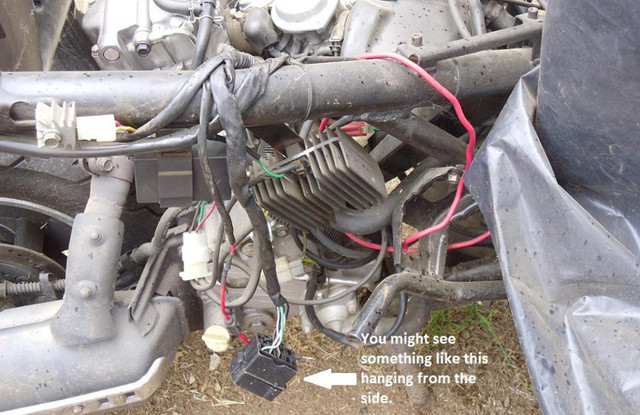
You may have gave up looking for the fuse box, but here are some pics of my fuse box. It seems to be located in a different place than any I have seen on here yet, but still under the seat. My bike is a 2006 BMS Macho Man 250 per side sticker that were on it. The VIN plate says Shanghai JMStar Motors, and also something and Baron Motors. I have had the bike torn apart since I bought it because I am repairing panels, and repainting them, along with a little other work. All panels have now been repaired and primered, but rain the last few days has kept me from painting them. Anyway since it is apart I figured I could take some good pics. Fuse box under the seat.   Close up of fuse box showing wiring and mount tab.  Fuse box showing where wires are going into another wire harness.  What you might see if the fuse box were hanging from the side.  |
|
Certified Clinician
 
Currently Offline
Posts: 67
Likes: 1
Joined: Mar 4, 2013 1:58:10 GMT -6
|
Post by vansmack2 on Jun 28, 2013 23:36:05 GMT -6
Good that we got that cleared up. Yea if stuff if getting juice with the IGNITION KEY CONNECTOR UNPLUGGED then it is getting juice from the RED WIRE someplace in the HARNESS. So Follow the RED THIN RED WIRE BACK and you will find it. Because the RED WIRE CARRIES THE JUICE to the KEY then the KEY feeds the rest of the system. Alleyoop That is basically what I said several post ago, so please start checking those wires starting with following that red wire from the positive battery post. justguy1 the wires coming from the switch are a cluster of wires (more than one wire), also know as a wiring harness. There will be several clusters of wires, or wiring harnesses, on your scooter. We are here to help, so good luck with finding the problem. I know from experience that electrical problems, such as shorts, can be the worst problems to have. |
|
Certified Clinician
 
Currently Offline
Posts: 67
Likes: 1
Joined: Mar 4, 2013 1:58:10 GMT -6
|
Post by vansmack2 on Jun 27, 2013 23:38:23 GMT -6
justguy1 if you disconnected the plug from the switch so that the switch was no longer connected, and your lights were still on, then you must have a short between your hot wire (positive) and the wires in your light circuit.
If possible carefully inspect your wiring from the positive terminal of the battery and the lighting, even if you have to take it out of the insulation around a bundle of wires. You can buy replacement conduit/insulation once the problem is resolved. You must have a bare spot in the wiring somewhere, and/or a pinched connection where a hot wire is touching the lighting wires.
|
|
Certified Clinician
 
Currently Offline
Posts: 67
Likes: 1
Joined: Mar 4, 2013 1:58:10 GMT -6
|
Post by vansmack2 on Apr 17, 2013 17:49:34 GMT -6
My originals looks like this, and I am trying to find something very similar to that. I have seem most of the styles at the links above, and will probably end up buying something different than the original. The original rectangular boot section measures about 5/8 inch wide (17mm) by about 1 inch long (25mm) by about 15/16 high (24mm). the hole is about 1/4 inch I/D (7mm).  |
|
Certified Clinician
 
Currently Offline
Posts: 67
Likes: 1
Joined: Mar 4, 2013 1:58:10 GMT -6
|
Post by vansmack2 on Apr 17, 2013 13:06:07 GMT -6
I know I can live without battery boots, but I prefer to have them to keep things looking nice, and for added safety. I have been looking online for ones like the flexible rectangular ones most of these Chinese scoots come with, but have not located the correct ones yet. I have come close though. Does anyone here know where to get battery cable boots that are very close to those original flexible ones?
|
|
Certified Clinician
 
Currently Offline
Posts: 67
Likes: 1
Joined: Mar 4, 2013 1:58:10 GMT -6
|
Post by vansmack2 on Apr 8, 2013 18:42:45 GMT -6
i found a 15A fuse (blue), changed it out and it started right up!!!! Thanks for all the help!!!!!!!!!!!!!!!!!!!!!!!!!!!!!!!!! Where was the 15 amp fuse that you changed out? Others may want to know in case they have the same problem. |
|
Certified Clinician
 
Currently Offline
Posts: 67
Likes: 1
Joined: Mar 4, 2013 1:58:10 GMT -6
|
Post by vansmack2 on Apr 4, 2013 17:42:39 GMT -6
cool !! you should charge for rights and royalty. or have it patented. very nice!!! That is what my mother said when I showed her my handy work. |
|
Certified Clinician
 
Currently Offline
Posts: 67
Likes: 1
Joined: Mar 4, 2013 1:58:10 GMT -6
|
Post by vansmack2 on Apr 4, 2013 15:42:53 GMT -6
Alleyoop,
You can definitely put this in the tips. i posted it to help everyone. You may want to save the pics, in case anything happens to me or my photobucket account.
|
|
Certified Clinician
 
Currently Offline
Posts: 67
Likes: 1
Joined: Mar 4, 2013 1:58:10 GMT -6
|
Post by vansmack2 on Apr 4, 2013 14:49:47 GMT -6
Here is a tutorial on how I repaired some of my broken body tabs in case anyone wants to try the same. Materials: Aluminum bar stock strip (for hook shaped tabs), aluminum flashing (for round hole tabs), hot glue, liquid steel, some tape (I used duct tape), a little bit of cardboard (or something similar), goof off or other cleaner to clean up excess liquid steel. Tools: Rotary tool (Dremel), grinder, hot glue gun, needle nosed pliers, file (optional). Hook type tab replacement: Step 1: Get a piece of aluminum bar stock. I used a piece that is 1/16" x 3/4" by 3' long. (see first pic) Step 2: Hold the end of the aluminum strip up against a good hook tab, and mark it with a pencil (or very fine tipped marker if it will fit). Mark the end curve, the inside of the hook and the inside lip edge of the body panel. you will also need to mark a vertical line on the strip about the with of smaller part of the hook tab. See the first pic for a better understanding. Mark a line about 1/2" below your body lip mark, since this is where you will cut the replacement hook tab off. If you used a pencil go over it with a permanent marker to mark the areas to be ground and cut. See the first pic for how it should look. Step 3: Grind the end of the aluminum strip round. Cut out the hook tab part with the Dremel, then cut your finished piece off. Step 4: Use your dremel to carefully grind down the plastic where the old tab was so that your new tab will lay flush with the edge of the plastic. Go slowly and test fit several times until you have it correct. You can use a file if you prefer. Step 5: Put a small amount of hot glue on the groove you just cut then insert your new tab. (Note: This is just to hold the tab in place until the liquid steel has time to set.) Repeat process to replace additional tabs. Round type tab replacement: Step 6: For round hole tabs cut a strip of the thin flashing about 5/8" to 3/4" wide and bend it to form using needle nose pliers, then hot glue the ends of it in place to temporarily hold it. Now apply liquid steel: Step 7: Mix enough liquid steel to glue in all your tabs. It will take a good amount. Step 8: Fill the area between the new hook tabs and the body panel with liquid steel. Put strips of cardboard on the ends to keep the liquid steel from running out before it dries. (see the pics) Step 9: If you made any replacement round hole tabs fill the space between the two sides of the new tab with liquid steel. Wrap tape around the metal to keep the liquid steel from running out before it dries. Step 10: Set you body panels upright to dry for at least 12 hours. You should check them every once in a while for the first few hours to see if any liquid steel if coming out, and clean it up if it does. Step 11 (final): Now that everything is dry you can remove the cardboard pieces, remove any tape used, and do any necessary final sanding, filing, hole drilling, etc. as needed. Now for the pics: Pic 1 the aluminum bar stock for hook tab repair.  Pic 2 the aluminum flashing for the round hole repair.  Finished tab with cardboard still in place.  Same as above, but different angle.  Two replaced tabs and one original. A small amount of liquid steel on this side.  Other side of above panel.  Good round hole tab.  Round hole tab repair.  Round hole tab repair pic 2.  |
|
Certified Clinician
 
Currently Offline
Posts: 67
Likes: 1
Joined: Mar 4, 2013 1:58:10 GMT -6
|
Post by vansmack2 on Apr 1, 2013 22:11:13 GMT -6
Even though diesel engines have glow plugs, they still have to get hot enough to ignite the fuel, which is what a spark plug does. Whether a spark plug, or glow plug, the theory of operation is still basically the same.
Ignite air/fuel mixture, push piston, turn crank, turn wheel, or wheels, move down the road.
|
|
Certified Clinician
 
Currently Offline
Posts: 67
Likes: 1
Joined: Mar 4, 2013 1:58:10 GMT -6
|
Post by vansmack2 on Mar 26, 2013 14:12:10 GMT -6
Sure man, you're welcome. If you can take some pics when you get to the disc brake I might be able to put something together for the tech library. If it's a hassle don't worry about, I know what a PITA it can be to take pics with greasy hands.  I think I can do that if I remember. I might get to it next week, but not sure. I am taking my time because I don't actually need the scoot finished for a while. |
|
Certified Clinician
 
Currently Offline
Posts: 67
Likes: 1
Joined: Mar 4, 2013 1:58:10 GMT -6
|
Post by vansmack2 on Mar 25, 2013 23:16:27 GMT -6
Now that is quite a tutorial. Thanks.
|
|
Certified Clinician
 
Currently Offline
Posts: 67
Likes: 1
Joined: Mar 4, 2013 1:58:10 GMT -6
|
Post by vansmack2 on Mar 25, 2013 14:47:03 GMT -6
I would not skimp when you replace the tire, (get a good one) if a tire fails it can mess your body up big time. I have a spare rear tire 120/90-10 already on a rim. When I do get a new tire it will be L rated or better. There does not seem to be as many tires available in this size, but I did find a Metzeler ME 7 Teen Scooter Tires 120/90-10 66L TL for a decent price of $39.82 currently (may change by the time I am ready to order), regular around $50.  |
|
Certified Clinician
 
Currently Offline
Posts: 67
Likes: 1
Joined: Mar 4, 2013 1:58:10 GMT -6
|
Post by vansmack2 on Mar 25, 2013 14:36:41 GMT -6
I may check out the 150 some time in the future, but I took a few parts already. I swiped the negative battery cable because mine was all taped up. I think it is also missing some other parts. The reg is so old it would cost a lot to register it here in California.
I do know a bit about mechanics, but it has been many years since I have done much on cars, or motorcycles. I took auto mechanics in college, but that was over 30 years ago, and as I got older, and cars got more complicated, I did less and less car repairs.
I used to have valve compressors, ring compressors, timing lights, micrometers, etc., but most of that is gone now. I do have a 6 inch digital micrometer that I use for measuring my slot car wheels and tires.
|
|
Certified Clinician
 
Currently Offline
Posts: 67
Likes: 1
Joined: Mar 4, 2013 1:58:10 GMT -6
|
Post by vansmack2 on Mar 25, 2013 14:15:40 GMT -6
The green arrow hose is OK that is your CARB OVERFLOW hose that stays as is. Alleyoop Good news. Then I guess all is well. I am going to paint my body panels because I have some in black original panels, and some in dark blue metallic from the 150 I got for parts. I will paint them with an Anodized Blue Metalcast paint, white primer first. After that I can put it together. In the mean time I can hook up the battery, and check carb adjustment, valve adjustment, etc. I already replaced the glass fuse to the battery with an ATC fuse holder, and checked the air filter. I should also replace the fluids. |
|

