Scooter Doc
   
Currently Offline
Posts: 387
Likes: 0
Joined: Feb 26, 2011 8:30:23 GMT -6
|
Post by bobf on May 13, 2011 19:40:54 GMT -6
Is it long enough to put a small spring over it? To keep some pressure and friction on it to keep it from turning.
.
|
|
Scooter Doc
   
Currently Offline
Posts: 387
Likes: 0
Joined: Feb 26, 2011 8:30:23 GMT -6
|
Post by bobf on May 12, 2011 12:24:30 GMT -6
Well, there is no spring out here in Colorado either. It is staying very cold at night and even has snowed recently. I am not as tough as you and I only have 15 miles on my new scoot while you said 300 miles. Between the cold and the 30 to 50 mile an hour winds I don't seem to get my scoot out to ride.
.
|
|
Scooter Doc
   
Currently Offline
Posts: 387
Likes: 0
Joined: Feb 26, 2011 8:30:23 GMT -6
|
Post by bobf on May 10, 2011 8:05:25 GMT -6
How much are going to paint? I would think that Dupli Color auto matching paints would do fine. Get a can or two and go to it. Just have to be conservative as I have had touch ups run and make a mess. I have gone so far as to paint an entire auto fender with such supplies and they came out OK. Biggest problem is all the masking and paint dust drifting around.
.
|
|
Scooter Doc
   
Currently Offline
Posts: 387
Likes: 0
Joined: Feb 26, 2011 8:30:23 GMT -6
|
Post by bobf on Apr 26, 2011 12:05:51 GMT -6
Near the end of April and we had snow yesterday. Only 45F today. So far I have only 12 miles on the scoot. Where did spring go this year?
.
|
|
Scooter Doc
   
Currently Offline
Posts: 387
Likes: 0
Joined: Feb 26, 2011 8:30:23 GMT -6
|
Post by bobf on Apr 8, 2011 8:17:33 GMT -6
I can remember way back into the late 1950's and 1960's, when Toyota was beginning to import to the US. If you bought a Toyota you needed to make sure you were near the dealer as far too many did not want to work on any of that Japanese junk for any money.
Toyota persevered and became quite popular and most mechanics decided that maybe they were OK to work on again. Toyota and other overseas manufacturers became quite popular and put a big hurt on the big 3 American companies. Today it is only Ford left that is not currently on some sort of subsidy from the government or lenders. The foreign auto's are doing quite well, in business appearance anyway.
.
|
|
Scooter Doc
   
Currently Offline
Posts: 387
Likes: 0
Joined: Feb 26, 2011 8:30:23 GMT -6
|
Post by bobf on Apr 5, 2011 8:34:12 GMT -6
Being a scoot beginner I would never be able to keep up with that run. I can't judge your speed but the lean on the turns seems pretty much for me. Maybe some day I will do better.
My nephew, his wife, two children, my sister (his mother) and husband spent some time in NZ last year. They sent lots of pictures and letters and they really loved the country side and the people. They visited parks and natural places and I believe the traveled both in the north and south. You have a great place to live.
.
|
|
Scooter Doc
   
Currently Offline
Posts: 387
Likes: 0
Joined: Feb 26, 2011 8:30:23 GMT -6
|
Post by bobf on Apr 3, 2011 11:57:58 GMT -6
The CFMoto Honda clone is 244cc and the Linhai Yamaha is 257cc. That may be some of the justification for the higher price. And maybe just the difference in manufacturers.
Both of those joint efforts are contracted deals. But where I live the Yamaha or Honda dealers won't acknowledge the agreements and tell me they won't service the machines. Seems strange to me. Income should be considered income if I was in business.
.
|
|
Scooter Doc
   
Currently Offline
Posts: 387
Likes: 0
Joined: Feb 26, 2011 8:30:23 GMT -6
|
Post by bobf on Apr 3, 2011 8:01:32 GMT -6
I only recently bought a 250cc scooter. I bought from a different dealer in California but had no real problems with the experience. Their prices were about the same and the had free delivery too. Once arrived I had to take off the covers and do what is called the PDI, pre delivery inspection. I did not do all per the PDI instructions available on this forum but did do as much as I could. I spent time from April 2010 till Jan 2011 to make up my mind. Ordered in late January, received in late February, and worked through some of March to get the PDI done. Our garage is unheated so I would wait until afternoon and the garage was above freezing. Still have only ridden the scoot for about 10 miles as we have strange springs here where I live. Way too much wind, some snow, cold, none encouraging me to ride very often. But the few times out I have learned a lot about the scoot and how to ride. I got the Motor Cycle Safety Course completed a year ago, In May last year, and got my drivers license in July. The rest was making up my mind on which scoot to order. I had the Burgman clone with the Linhai Yamaha clone engine in my favorites file. But I then chose the Rocketa Honda Clone scoot with the CFMoto Honda Clone engine in it. My final reason was that I wanted that extra large trunk that came with the Rocketa Honda style machine. It looks to me like I have made a good choice for me. The scoot is about 300 pounds and that is plenty for me to handle if by chance we lay down. I am just about 79 years old and no longer the strength of an ox. But the limited driving I have done is enough to tell me there is plenty of power for what I intend to do and the trunk can hold at least two gallons of milk and still room for some other groceries. Big difference from one to the other. The Linhai Yamaha engine lies flat and the CFMoto Honda engine is upright. So I think there might be sufficient room for a large storage area under the seat of the Burgman clone, just a guess. Not so much room under the Honda clone seat. Look here to see what my experience was. www.scooterdoc.proboards.com/index.cgi?board=250cc&action=display&thread=3148I hope these comments help you to make a decision. . |
|
Scooter Doc
   
Currently Offline
Posts: 387
Likes: 0
Joined: Feb 26, 2011 8:30:23 GMT -6
|
Post by bobf on Mar 31, 2011 14:42:26 GMT -6
Hello, I am new to this site and with a new 250 scooter as well. I do remember that somewhere I saw there is a adjustment connector right near the upper brake fluid box. It mentioned that you can adjust the cable so there is some space to go before hitting the handle bars. I think they called it slack adjustment. I see no one so far has made that comment so here it is. Maybe the problem is greater than an adjustment, but adjustments are much cheaper.
Sudden failure could be a loosened of broken cable.
.
|
|
Scooter Doc
   
Currently Offline
Posts: 387
Likes: 0
Joined: Feb 26, 2011 8:30:23 GMT -6
|
Post by bobf on Mar 31, 2011 8:06:46 GMT -6
Thanks to all. I guess valve stems can be a problem. So before I try any twisting I will make sure there is a source for a replacement close to home. Several motor cycle shops around so I expect they might have some valve stems around. No Chinese scooter shops for several hours of driving but it sounds like the valve stems are pretty much standard.
By fall I may be living within 30 miles of three Chinese scooter shops. Maybe then I won't get hassled for not buying a recognized brand name.
.
|
|
Scooter Doc
   
Currently Offline
Posts: 387
Likes: 0
Joined: Feb 26, 2011 8:30:23 GMT -6
|
Post by bobf on Mar 30, 2011 19:45:03 GMT -6
Quick response. Thanks.
Swing them over? Aren't they captured somehow? Or is it just the air pressure. If air pressure I can then let the pressure down, rotate the stems, inflate. Is this correct?
.
|
|
Scooter Doc
   
Currently Offline
Posts: 387
Likes: 0
Joined: Feb 26, 2011 8:30:23 GMT -6
|
Post by bobf on Mar 30, 2011 19:38:50 GMT -6
This is a problem on my scooter, just wonder if some reason for the actions. Maybe a dumb question but I will ask it anyway.
MC-54-250 YY250T
On both the front and rear wheels the inflation stem is pointed to the brake disc side of the wheel. This makes it harder to fit the air hose or gage. Is there any reason for this? If not then when ever I must take the tire off I could rotate it to the free side of the wheels.
My daughter was visiting last week and she said hers, she has a 50cc, was the same way and it was difficult because of the brakes and brake cylinders. That was why I decided to ask.
It seems like dumb luck to me to have them that way.
.
|
|
Scooter Doc
   
Currently Offline
Posts: 387
Likes: 0
Joined: Feb 26, 2011 8:30:23 GMT -6
|
Post by bobf on Mar 22, 2011 14:01:16 GMT -6
Just in time for riding season? I hope so. But yesterday we had 50 to 60 mile per hour winds and over night it snowed. Just an inch of snow and it is mostly melted this afternoon but still cold. I suppose that April will bring us some warmer weather. Then I go ride and ride and ride.
And many thanks for your comments about my efforts and the scooter appearance.
|
|
Scooter Doc
   
Currently Offline
Posts: 387
Likes: 0
Joined: Feb 26, 2011 8:30:23 GMT -6
|
Post by bobf on Mar 21, 2011 14:45:36 GMT -6
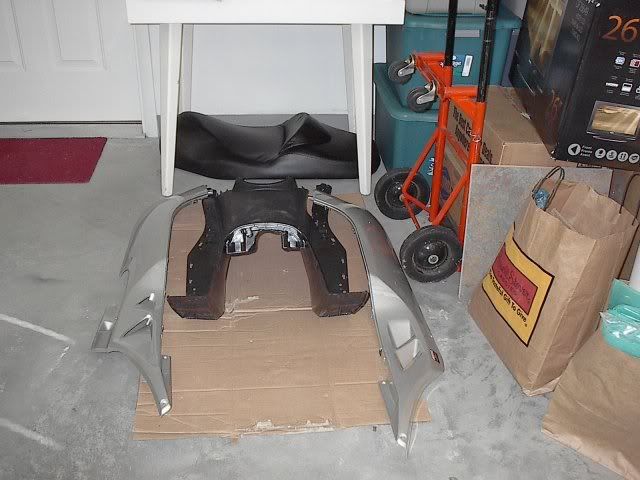
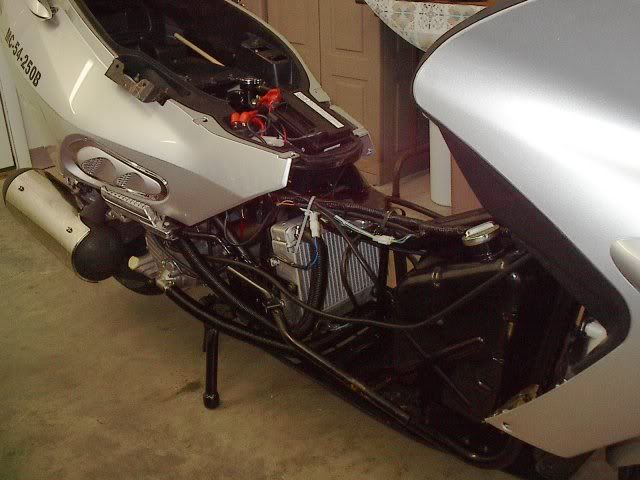
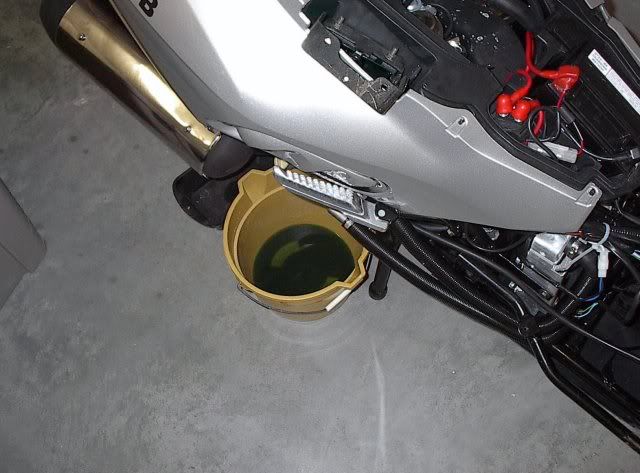
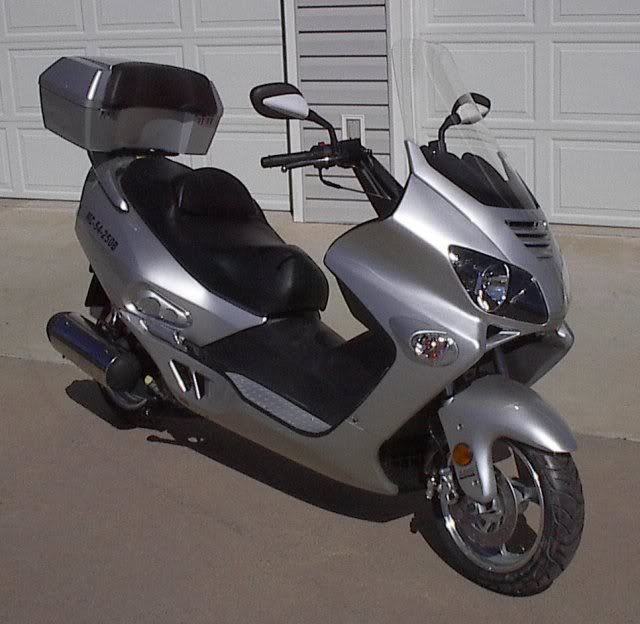
My PDI experiences. We can start with the 550 pound delivery of the scooter in a metal frame on a wooden pallet. The delivery driver delivered it to my house and transported into the garage to where I wanted it. We looked down into the top of the cardboard part and saw no damage so I signed the release. Then I removed the cardboard and the metal frame and got the scoot lifted off the packaging down to the floor. Wish my adult kids had been here as I nearly did not get the 300 pound scoot out of the frame base. I survived and the scoot lives. Then I started to fiddle with getting it started, but that was no problem at all. A few tries and it started to run. Had some good help from the forum on how to set the idle speed. Some days passed and I kept smelling a sour odor and seeing spots on the garage floor. At first I though it was a water leak and asked for ideas about finding the leak with the covers on. Advice was to remove the covers. So that became a project for the next day. I took off the aluminum foot panels. I took the screws out of the right and left side panels. Then I took the screws out of the floor panels. The final thing I did was to unscrew the three bolts on each side of the floor panel. I did not take out the two plastic retainers on each side so the side panels remained attached to the floor panel. Then I took two screws off the upper side panels near the front end and also had to remove the seat to finish that job. With all attaching screws and bolts removed I then began the tedious job of flexing panels, pulling tabs out, helping the floor board to come loose. I had to remove the gas cap and radiator overflow bottle caps to get the front of the floor panel loose. Finally it was all released and then the task of lifting it up and out without scratching the body panels. I got it out by lifting the rear of the floor panel from one side then the other until finally it cleared and the front portion finally followed up and out from under the handle bar area. Later I decided that putting it all back on in one piece would be next to impossible to do and likely would scratch or break something, so I separated the side panels from the floor panel by pulling the plastic retainers out. There is a near match at the Car Quest auto stores with the part ID of AP20349. It looks very close and I bought some but did not have to use them as the old ones were not damaged when I pulled them out. I have them for the next time, just in case.   Now we begin the search for the water leaks. It turns out to be the gas level sensor gasket is shot. I tried AutoZone for gasket material, none. Then I drove out to a Honda place and they sold me a Oring that did not work on the scoot. Finally to the Car Quest where they had some 1/8” rubberized cork for fuel systems. They sold me a two inch wide piece off of the roll. I then measured inside and outside from the sensor and drew it on the cork and cut it with razor knife and scissors. A little trim and it fit perfectly. Replaced the sensor, filled the tank, tiny tighter on the nuts and it quite leaking. Then I went to the coolant change out. It was very dark and had some gritty looking stuff that settled out. Don't know what that might have been but it is gone. I did not have a hose outside as it was way too cold. I did the best I could with a bucket and funnel and burped the best I could. Then I refilled with the proper aluminum friendly coolant. Ran the engine and burped some more.  Next was the oil change. Removed the drain hole on the side and found two Styrofoam balls and some fuzzy stuff on the filter. Then I took the bottom plug out and finished the last bit of drain. Reinstalled the bottom bolt first then the regular drain plug with the filter and spring attached. Put in some oil till it reached the fill mark. No leaking so far. Finally I did the gear oil. Extra work as the guard needs removed and replaced. There I had a bottle of Honda gear oil and the neck just fit in the fill hole so all I had to do was squeeze the bottle till it was overflowing. Wipe up the overflow and put the bolt back in. Front tire was flat and the back tire was low. I inflated both to approximately 30 pounds. Two days later the front was flat again and the back had lost a few pounds. Tightened the cores and refilled. Still some lose over time, but not much. I think I will replace those cores one of these days and see if that will help. Now we put the covers back on. I started by draping a blanket over the rear covers to prevent any scratching of the panels. Then I put the floor panel over the center, with the front going down and in first. Then I pulled the upper corner of the rear panels out so I could get the floor panel inside. This took a couple efforts from one side to the other till the floor panel was finally in place in the rear. Then I worked at the front of the floor panel till I got its tabs in place. Once it seemed to be settled in I started to put some screws in to hold it in place. My first big mistake at reassembling. I put the left lower panel on before I screwed the three bolts into the floor side parts, foot rest area. As a result I could only get two bolts to take thread and tighten. So for that one bolt I put a glob of silicon on it to keep it from rattling and the next time I am in the mood I will take the side panel off so I can push up from underneath till the bolt takes some threads and tightens. On the right side I put the bolts in with no problems and set a couple screws too. Then I put the lower right side panel on. Slip the tabs on the lower side panel into the slots first. It may take a bit of help to get the tabs to line up. I used a flat screw driver from above down into the path of the tab to make it ride up and into the slot. The old plastic retainers worked but not sure if pried out again so I do have the new ones that look close. May need to put a drill through the holes to open just a tad first. Not too big though or the retainer won't have enough to grab on. At last, I put the seat back on and tightened that up real good. Now with all the internal panels and all the side panels in place it looks just like the scooter I had bought. But now it has all fresh liquids to take me around the town and elsewhere.  Lots of help to make this happen. Enjoyed all the help I got. Will probably be more times I get confused and maybe some times I might be able to help some one else as new as I have been. . |
|
Scooter Doc
   
Currently Offline
Posts: 387
Likes: 0
Joined: Feb 26, 2011 8:30:23 GMT -6
|
Post by bobf on Mar 14, 2011 19:41:48 GMT -6
I was just working on my 244 Honda clone and by memory the hoses went this way.
From the water pump to front of radiator and across to the lower opening.
From the radiator fill on top, down to the bottom, then forward to beyond the radiator front, the up and into the upper opening. Also from the the radiator fill opening there was a smaller line that went forward to the overflow bottle under the floor mat. I forget how that was connected.
I hope this is helpful.
.
|
|

